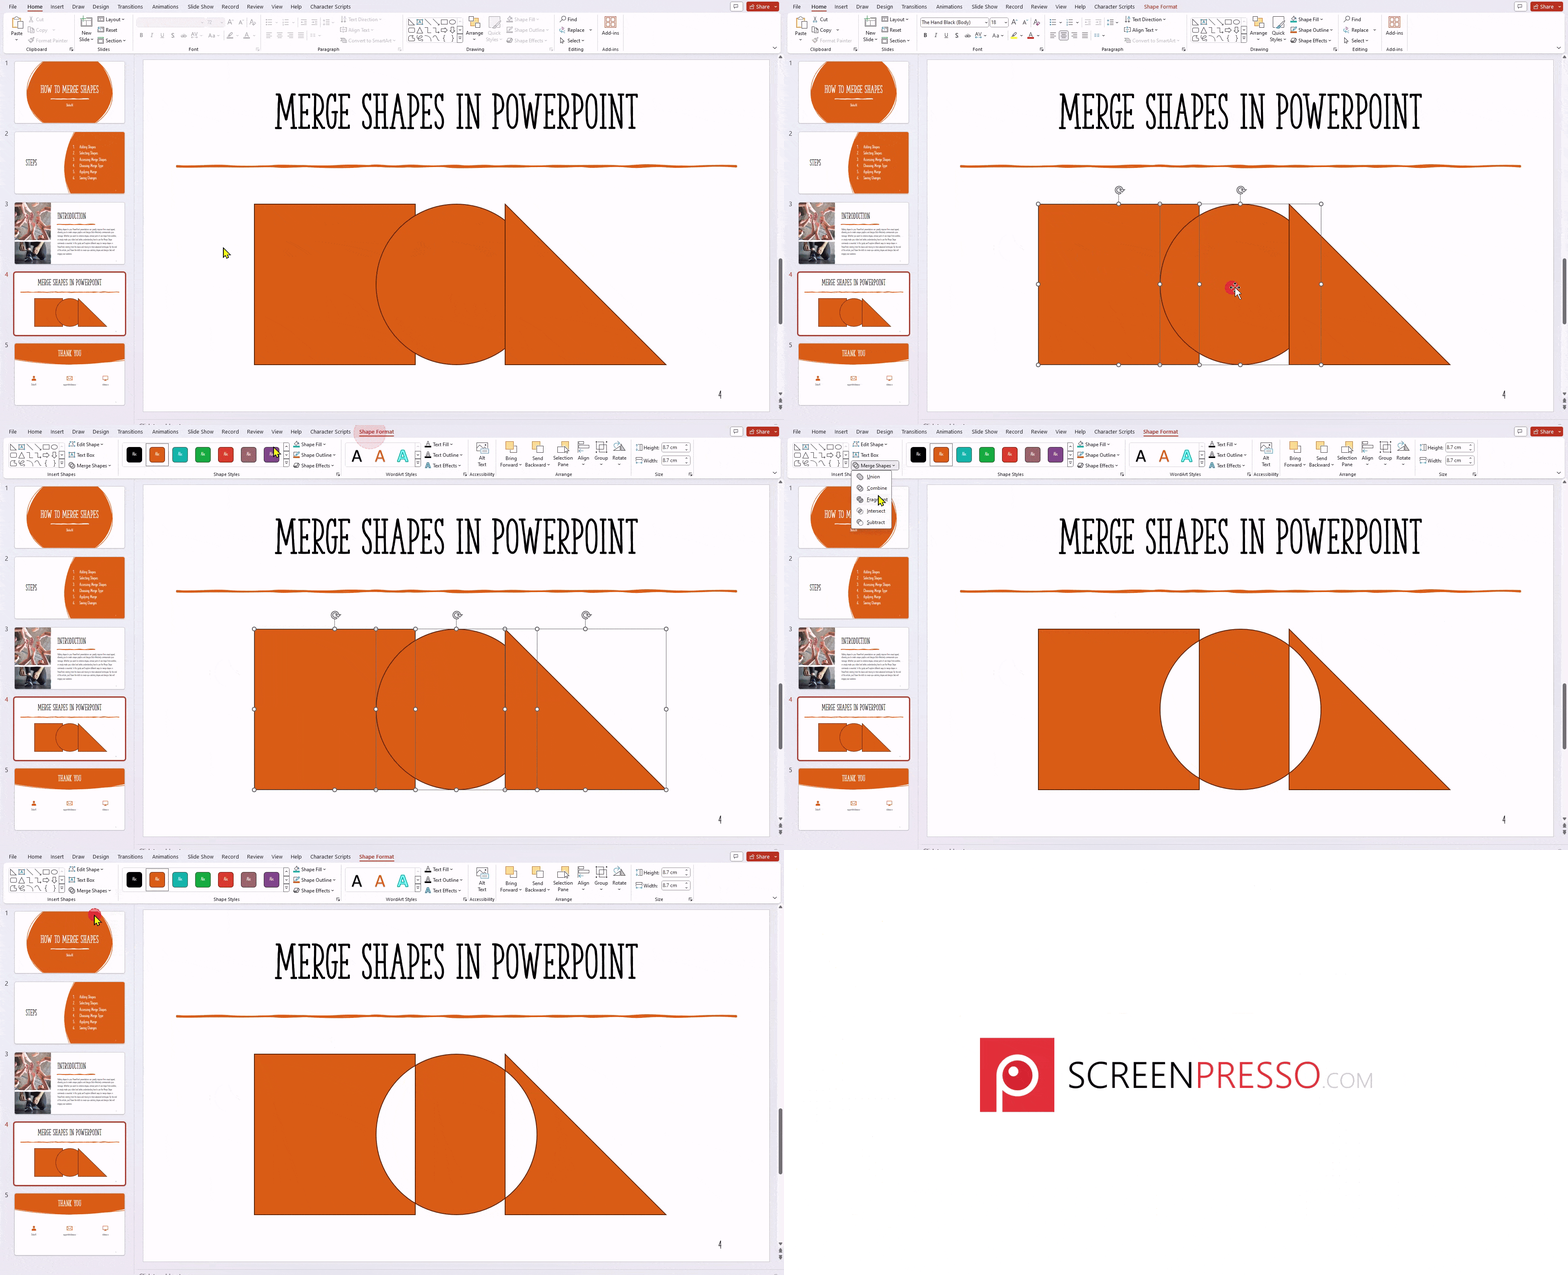
Adding shapes to your PowerPoint presentations can greatly improve their visual appeal, allowing you to create unique graphics and designs that effectively communicate your message. Whether you want to combine shapes, remove parts of one shape from another, or simply make your slides look better, understanding how to use the Merge Shape commands is essential.
In this guide, we’ll explore different ways to merge shapes in PowerPoint, starting from the basics and moving to more advanced techniques. By the end of this article, you’ll have the skills to create eye-catching shapes and designs that will engage your audience.
What Is Merge Shapes in PowerPoint and Why It Is Important?
The Merge Shapes feature in PowerPoint is a handy tool that lets you combine two or more shapes to create a new custom shape. This feature can greatly enhance the visual appeal and clarity of your presentations.
Here are a few ways it can be useful in your presentations:
- Adding depth and dimension to your slides.
- Emphasizing specific areas of your presentation.
- Creating visually engaging diagrams, flowcharts, and timelines.
- Updating your slide backgrounds.
- Designing customized graphics and icons.
<SlidesAICTA1 />
Steps to Merge Shapes in PowerPoint
1. Adding Shapes
To include shapes in your PowerPoint slide, head to the ‘Insert’ tab on the PowerPoint Ribbon. In the ‘Illustrations’ group, click ‘Shapes.’ Choose your desired shape from the drop-down menu, then click and drag it onto your slide. Repeat for each shape, ensuring they overlap as needed.
2. Selecting Shapes
To select multiple shapes, hold down the ‘Shift’ key and click on each shape you want to merge.
3. Accessing Merge Shapes
Once shapes are selected, go to the ‘Shape Format’ tab on the Ribbon. In the ‘Insert Shapes’ group, click ‘Merge Shapes’ to see merge options.
4. Choosing Merge Type
In the drop-down menu, select your merge preference:
- Union: Combines shapes into one.
- Combine: Removes overlaps to form a new shape.
- Fragment: Splits shapes at intersections.
- Intersect: Forms a shape from overlapping areas.
- Subtract: Removes overlapping parts of one shape from another.

5. Applying Merge
After choosing, PowerPoint will merge shapes accordingly. Adjust the merged shape’s size, position, and formatting as needed.
6. Saving Changes
Once satisfied, save your file to keep changes. Edit or use the shape in your presentation.
These steps explain merging shapes in PowerPoint, helping you create custom designs for presentations.
Common Mistakes to Avoid When Merging Shapes in PowerPoint
1. Shape Selection
Make sure to select all the shapes you want to merge before using the “Merge Shapes” or “Combine Shapes” feature.
2. Compatibility Check
Check that the shapes you’re trying to merge can actually be merged using the “Merge Shapes” feature. Some shapes might not work together.
3. Stacking Order Adjustment
Remember that the order you select shapes in can change how they merge. If the result isn’t what you expected, try rearranging the order of the shapes.
4. Overlapping Areas
Be aware that merging shapes can create areas where they overlap. Adjust the shapes or use options like “Fragment” or “Intersect” to fix any overlap issues.
5. Grouping Merged Shapes
After merging shapes, it’s a good idea to group them together to avoid accidentally changing the merged shape.
6. Selecting the Correct Merge Option
Choose the right merge option (Union, Combine, Fragment, Intersect, or Subtract) based on what you want the final shape to look like.
7. Alignment and Distribution
Once you’ve merged shapes, make sure they’re aligned properly and evenly distributed for a neat and professional finish in your presentation.
<SlidesAICTA2 />
Closing Thoughts
With a little practice and these helpful tips, you’ll be merging shapes in PowerPoint like a pro in no time. This powerful feature unlocks a world of creative possibilities, allowing you to design unique and impactful visuals that will leave a lasting impression on your audience. So, go forth and unleash your inner design guru!
Frequently Asked Questions Related to Merging Shapes In PowerPoint
How can Merge Shapes be used in presentations?
Merge Shapes can be used in presentations to add depth and dimension, highlight specific areas, create diagrams and flowcharts, enhance slide backgrounds, and design custom graphics and icons.
How do I merge shapes in PowerPoint?
To merge shapes in PowerPoint, select the shapes you want to merge, navigate to the “Format” tab, click on “Merge Shapes,” and choose one of the available merge options (Union, Combine, Fragment, Intersect, or Subtract) based on your desired outcome.
Can I undo a merge operation in PowerPoint?
Yes, you can undo a merge operation in PowerPoint by pressing Ctrl + Z or selecting “Undo” from the Edit menu.
Are there any limitations to merging shapes in PowerPoint?
While Merge Shapes offers a range of options for combining shapes, some complex shapes may not merge as expected. It’s recommended to experiment with different shapes and merge options to achieve the desired result.
Why is “Merge Shapes” not available in PowerPoint?
There might not be any shapes selected on your slide. The “Merge Shapes” option appears only when you have at least two shapes chosen. Try inserting some shapes and then try merging them!
How do I merge shapes in PowerPoint using Union?
To merge shapes with Union in PowerPoint, select the shapes and choose “Merge Shapes” > “Union” under the Drawing Tools Format tab (appears when shapes are selected).
How to merge two shapes using the subtract option in PowerPoint?
- Select two shapes (hold Shift to pick both).
- Go to the Shape Format tab (appears when shapes are selected).
- Click Merge Shapes > Subtract. (Subtracts second shape from first).
Can you merge 2 shapes in powerpoint?
Yes, You can merge 2 shapes in PowerPoint! Select the 2 shapes (hold Shift to pick both) and then under the “Shape Format” tab (appears when selected), choose “Merge Shapes” for a combined shape.


