Professional presentations, whether you use them as your business deck or for an assignment, require you to add neatly edited images. For that, you need to learn how to blur an image in Google Slides for easier and better presentation.
Blurring an image in Google Slides is simple if you understand the best way that suits your convenience. There are two ways in which you can do it, and today, we will discuss both methods step-by-step.
Methods to Blur an Image in Google Slides
Method 1: Using the Transparency Adjustment
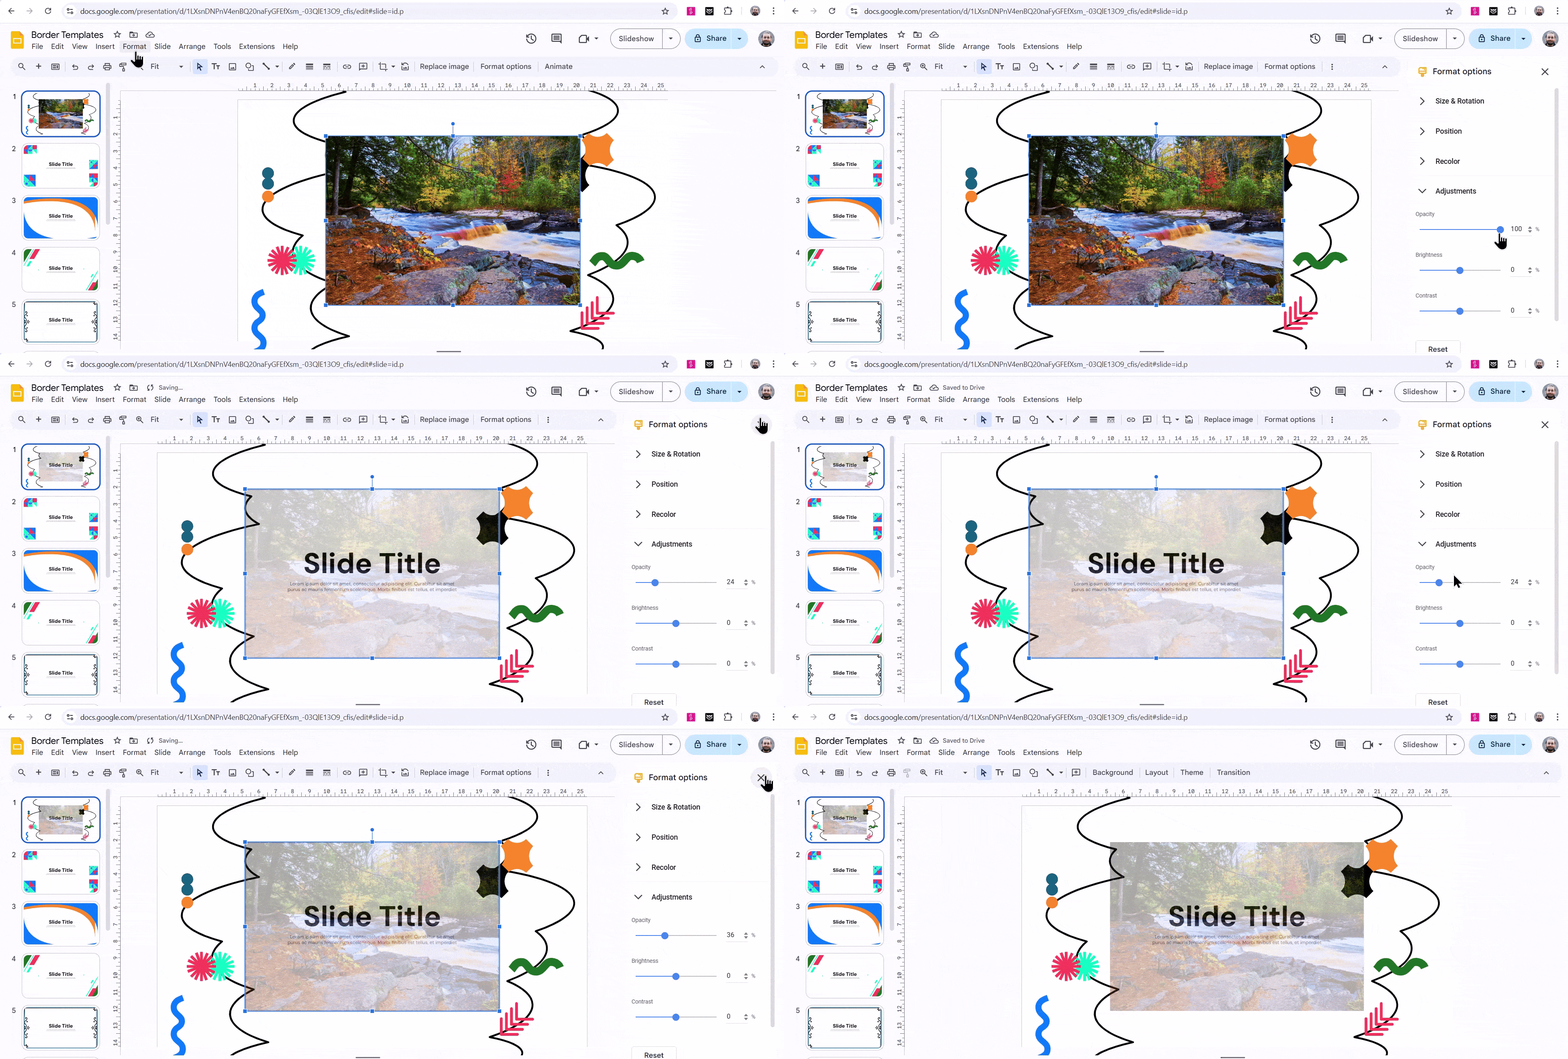
If you want to create a subtle blur in your image in Google Slides to shift the focus from the background to the text, adjusting the image’s transparency is a quick and easy way to achieve this effect. Here’s a step-by-step guide to help you blur an image using this method.
- Step 1: Open your Google Slides presentation: Launch the presentation where you want to work on the image. Make sure you’re signed in to your Google account.
- Step 2: Locate the slide with the image: Go to the specific slide that contains the image you plan to blur. If the image hasn’t been added yet, insert it before proceeding.
- Step 3: Select the image: Click directly on the image to highlight it. A border with adjustment handles will appear, indicating the image is selected.
- Step 4: Access the “Format options”: Use the toolbar at the top of the screen to click on the “Format options” button. You can also right-click on the image and select “Format options” from the dropdown menu.
- Step 5: Open the “Adjustments” panel: Once the Format Options panel appears on the right-hand side of your screen, look for and expand the “Adjustments” section.
- Step 6: Find the “Opacity” slider: In the Adjustments panel, you’ll see a slider labeled “Opacity”. This is the tool you’ll use to control the transparency of the image.
- Step 7: Adjust the opacity to create a blur effect: Drag the “Opacity” slider to the right to increase transparency, softening the image for a blurred effect. Experiment with the slider until the image is as blurred as you want it to be.
- Step 8: Finalize the effect: Once you’re satisfied with the level of blur, close the Format options panel to declutter your workspace. The changes you made will automatically be applied to your presentation.

This is a straightforward method to add a soft, blurred effect to an image without needing advanced editing tools. It’s perfect for creating a polished and professional look for your slides!
<SlidesAICTA1 />
Method 2: Overlaying Shapes with Transparency
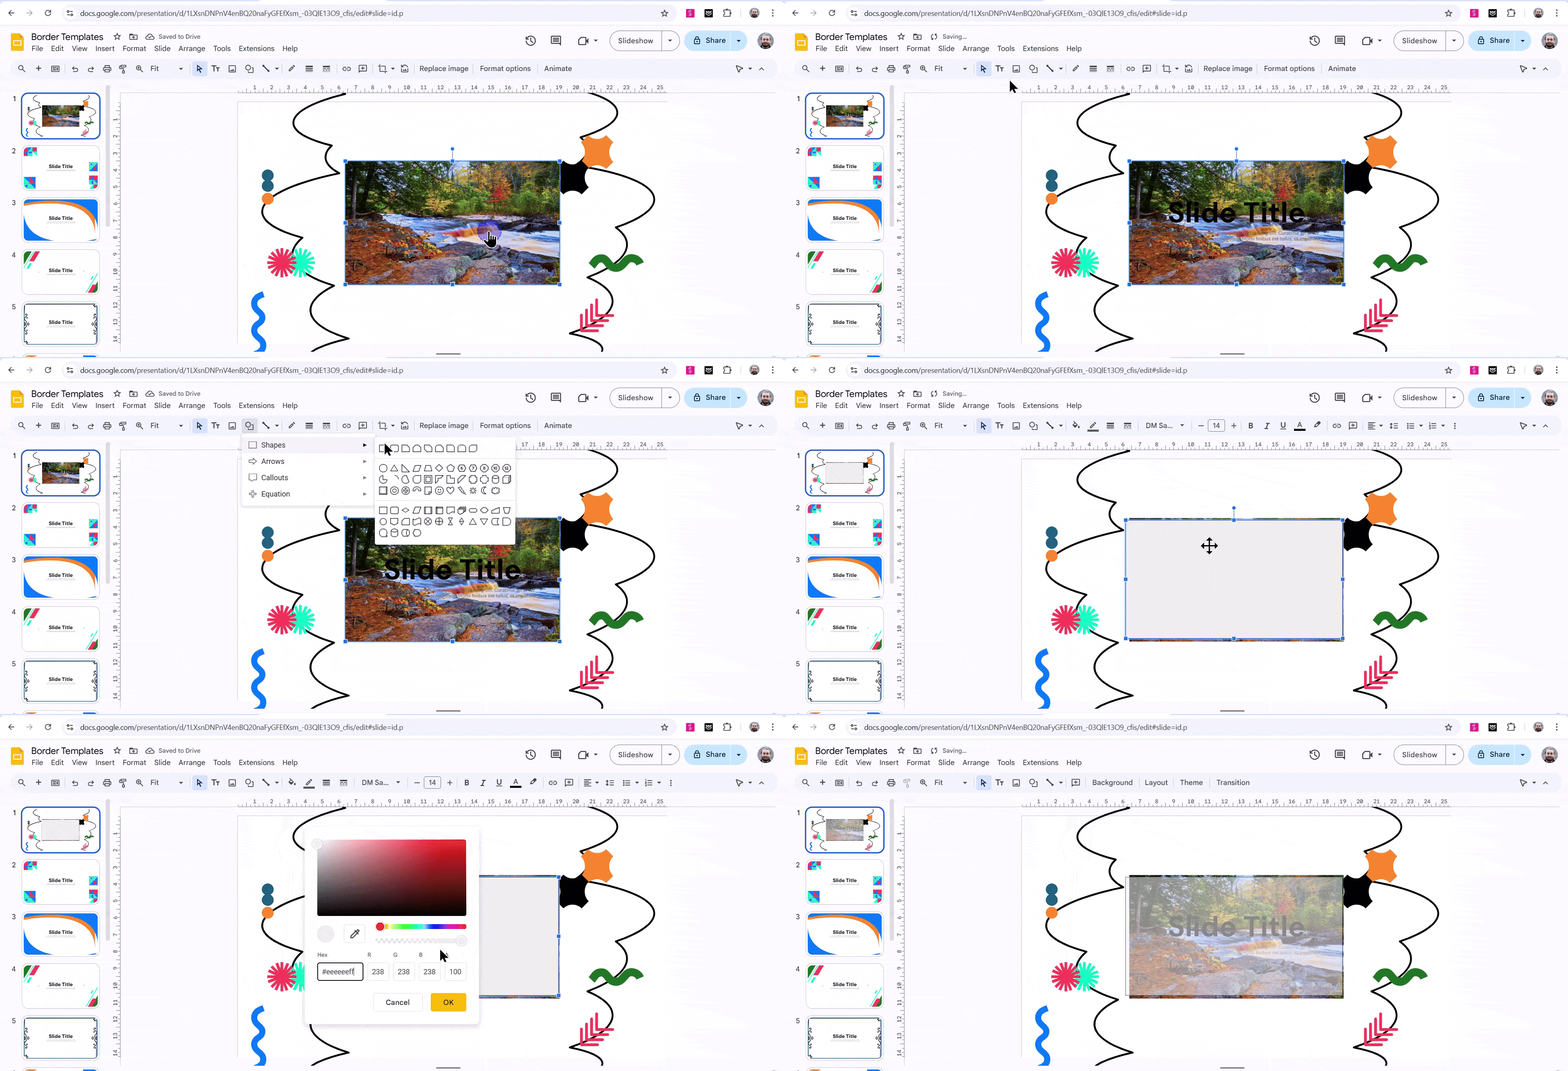
Overlaying shapes with transparency is another method you can use to blur an image in your Google Slides without leaving the platform. Here’s how to do it step by step:
- Step 1: Open your Google Slides presentation: Start by launching your Google Slides document where you want to apply the blur effect.
- Step 2: Find the slide with the image you want to blur: Scroll through your slides and go to the one containing the image you want to work with.
- Step 3: Add a shape to cover the desired area: Click on Insert in the top menu, then select Shape > Shapes, and choose a shape that suits the part of the image you want to blur. For example, you might pick a rectangle for a straightforward section or a circle for something round. Place and resize the shape to cover the area precisely.
- Step 4: Customize the shape’s color: Once the shape is in position, click on it to select it. Next, go to the toolbar and click Fill Color. Choose Custom to open the color adjustment panel. Here, you can select any color you like to complement your slide’s theme.
- Step 5: Adjust the transparency to create the blur effect: In the Custom Color settings, you’ll see a transparency slider. Drag this slider to make the shape semi-transparent, creating a blurred effect over the image. The more transparent you make it, the softer the blur will appear. Experiment until you get the perfect look for your presentation.

<SlidesAICTA2 />
Conclusion
Getting a blurred effect in Google Slides might take a little extra effort, but it’s definitely a skill worth having. With the right tools and techniques, you can transform your slides into something not only informative but also visually striking.
Moreover, not only can you blur an image in Google Slides, but you can now also create an entire presentation without having to spend hours and hours on how the slides look. With Slides AI, save hours worth of time by creating presentations in just a few clicks!
Explore the power of an AI Google Slides generator to streamline your workflow and create stunning presentations effortlessly.
Frequently Asked Questions Related to Blurring an Image in Google Slides
1. How can I blur part of an image in Google Slides?
It isn’t possible to just blur a part of an image in Google Slides. However, you can take the help of external image editors to blur whatever part of the image you like and then upload it to Slides.
2. What are the best tools to blur an image before adding it to Google Slides?
Some great options for blurring an image are online tools like Fotor, Canva, and Pixlr. These platforms make it simple to apply a blur effect. Once you’re done editing, just download the image and upload it to Google Slides.
3. What is the best image format for blurring an image in Google Slides?
Both PNG and JPEG formats work well for blurring images in Google Slides. If your image includes transparency or has intricate details, PNG is often the better choice for maintaining quality.


