Did you know that incorporating multimedia elements can significantly enhance engagement while creating dynamic presentations?
Audio takes the spotlight for its knack for boosting understanding, setting impactful vibes, and generally keeping the viewers engaged. Learning how to add audio to Google Slides can be pretty nifty, especially if you are a presenter.
Mastering this skill will elevate the impact of your presentations and captivate your audience. So, dive into this step-by-step guide on how to insert audio into Google Slides with a few clicks.
How to Insert Audio Into Google Slides: 5 Easy Ways
There are several ways to learn how to add audio to Google Slides. We have listed some of the easiest methods to insert audio, in just a few easy steps. Take control of ensuring that your presentations are engaging and fun with these 5 simple ways.
The steps to insert audio into Google Slides from Google Drive are as follows:
1) Adding Audio from Google Drive
Step 1: Navigate to your Google Drive and press the +New button at the top left of your screen.
Step 2: Use the dropdown menu to select File Upload. Then choose your audio files and press Open. Your file should start uploading to your drive.
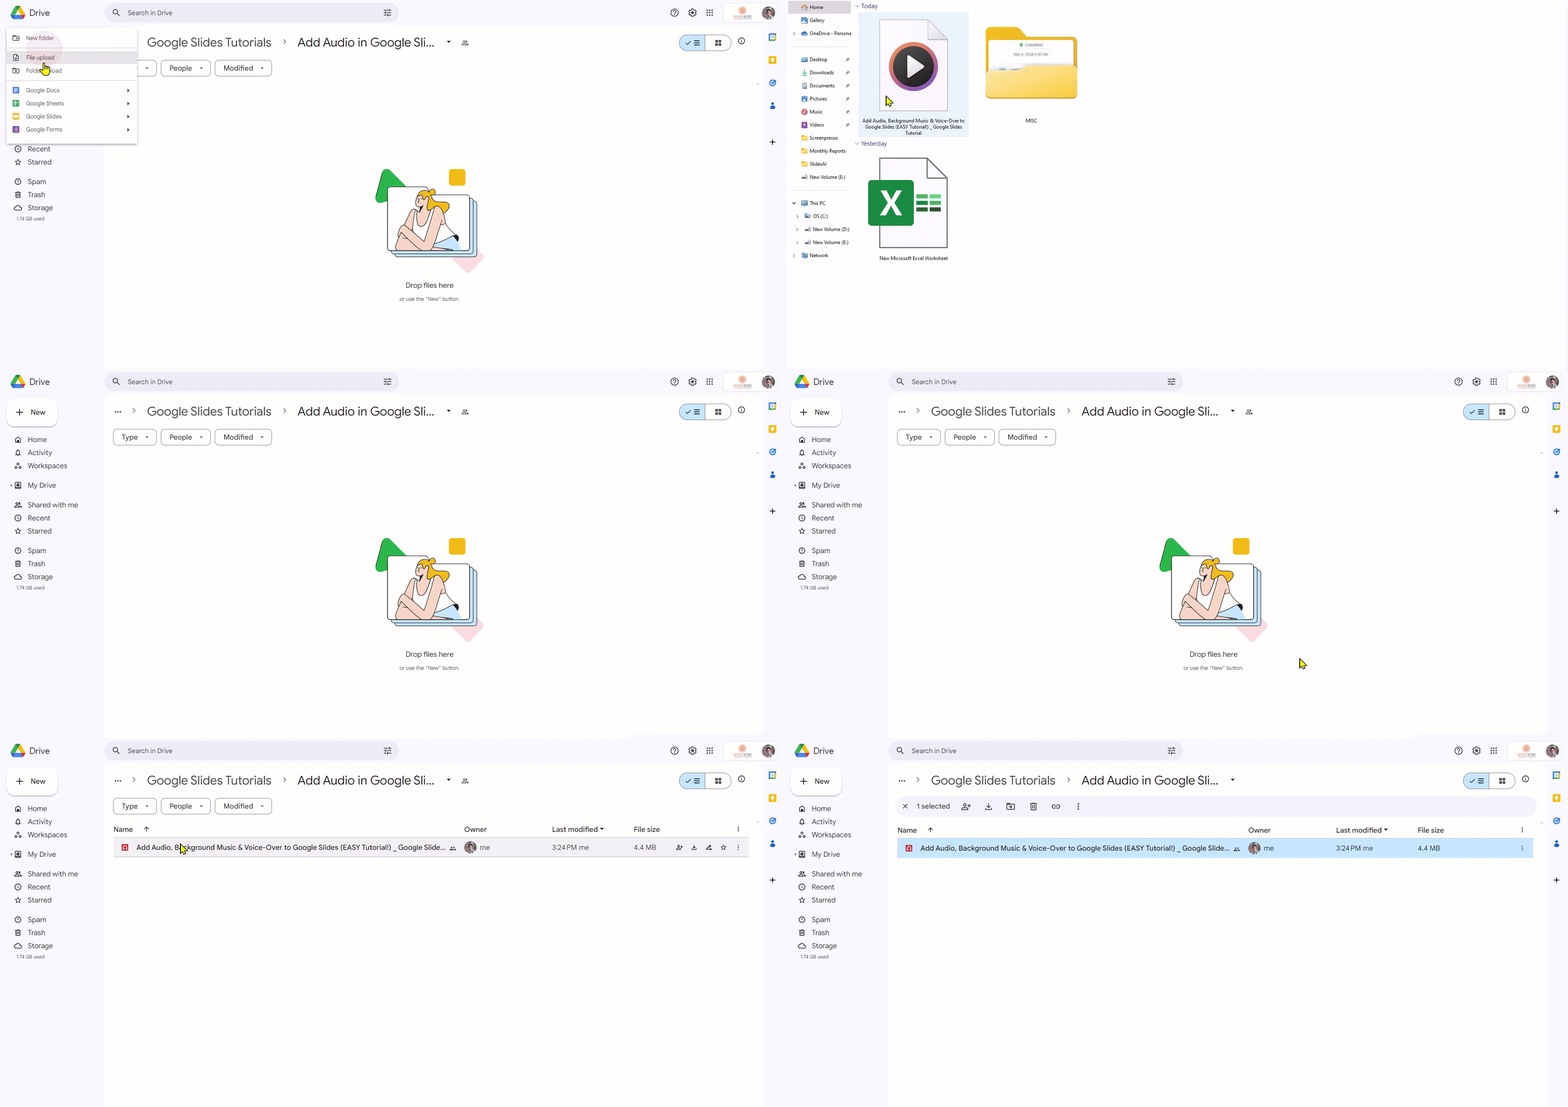
Step 3: Now you’re ready to add your audio file to your Google Slides presentation.
Step 4: Open your existing presentation document.
Step 5: Select the slide where you want to add your audio track. Navigate to the top bar of your screen, and choose Insert. From the dropdown menu, select Audio, and choose the relevant file from your Google Drive.
2) Inserting Audio Using a Shareable Google Link
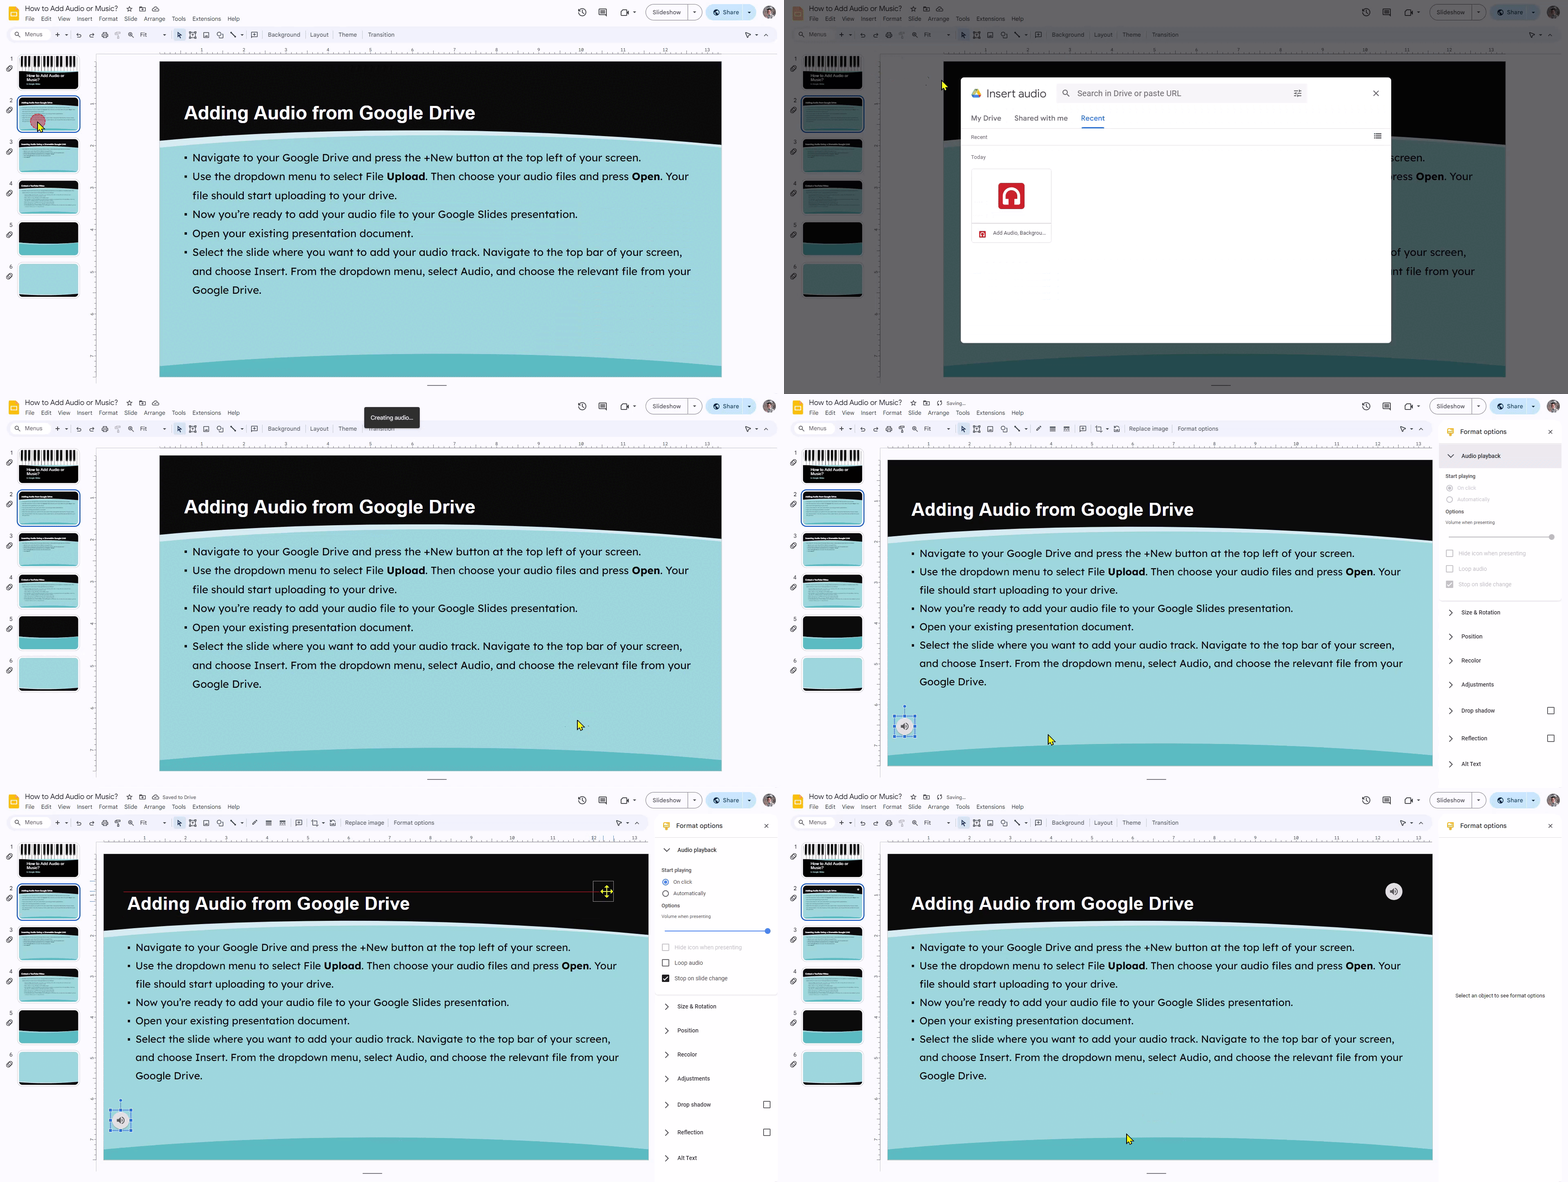
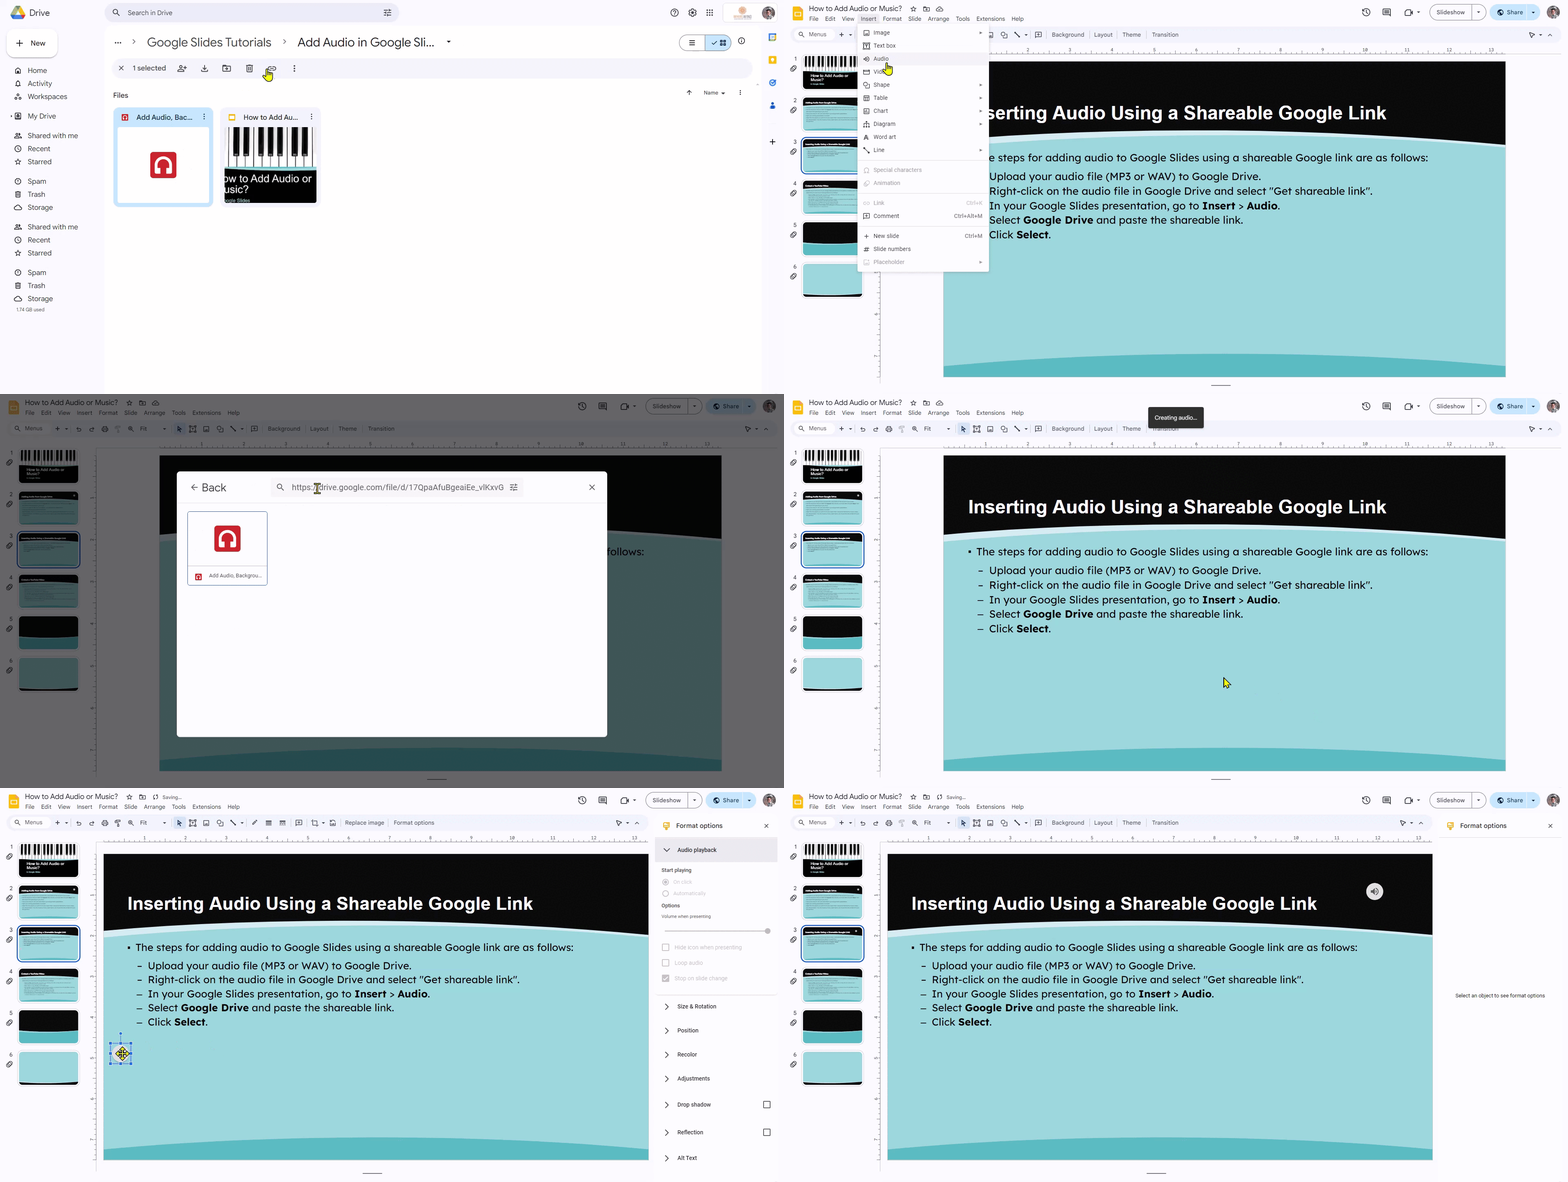
The steps for adding audio to Google Slides using a shareable Google link are as follows:
Step 1: Upload your audio file (MP3 or WAV) to Google Drive.
Step 2: Right-click on the audio file in Google Drive and select “Get shareable link”.
Step 3: In your Google Slides presentation, go to Insert > Audio.
Step 4: Select Google Drive and paste the shareable link.
Step 5: Click Select.
<SlidesAICTA2 />
3) Embed a YouTube Video (For Music or Sound Effects)
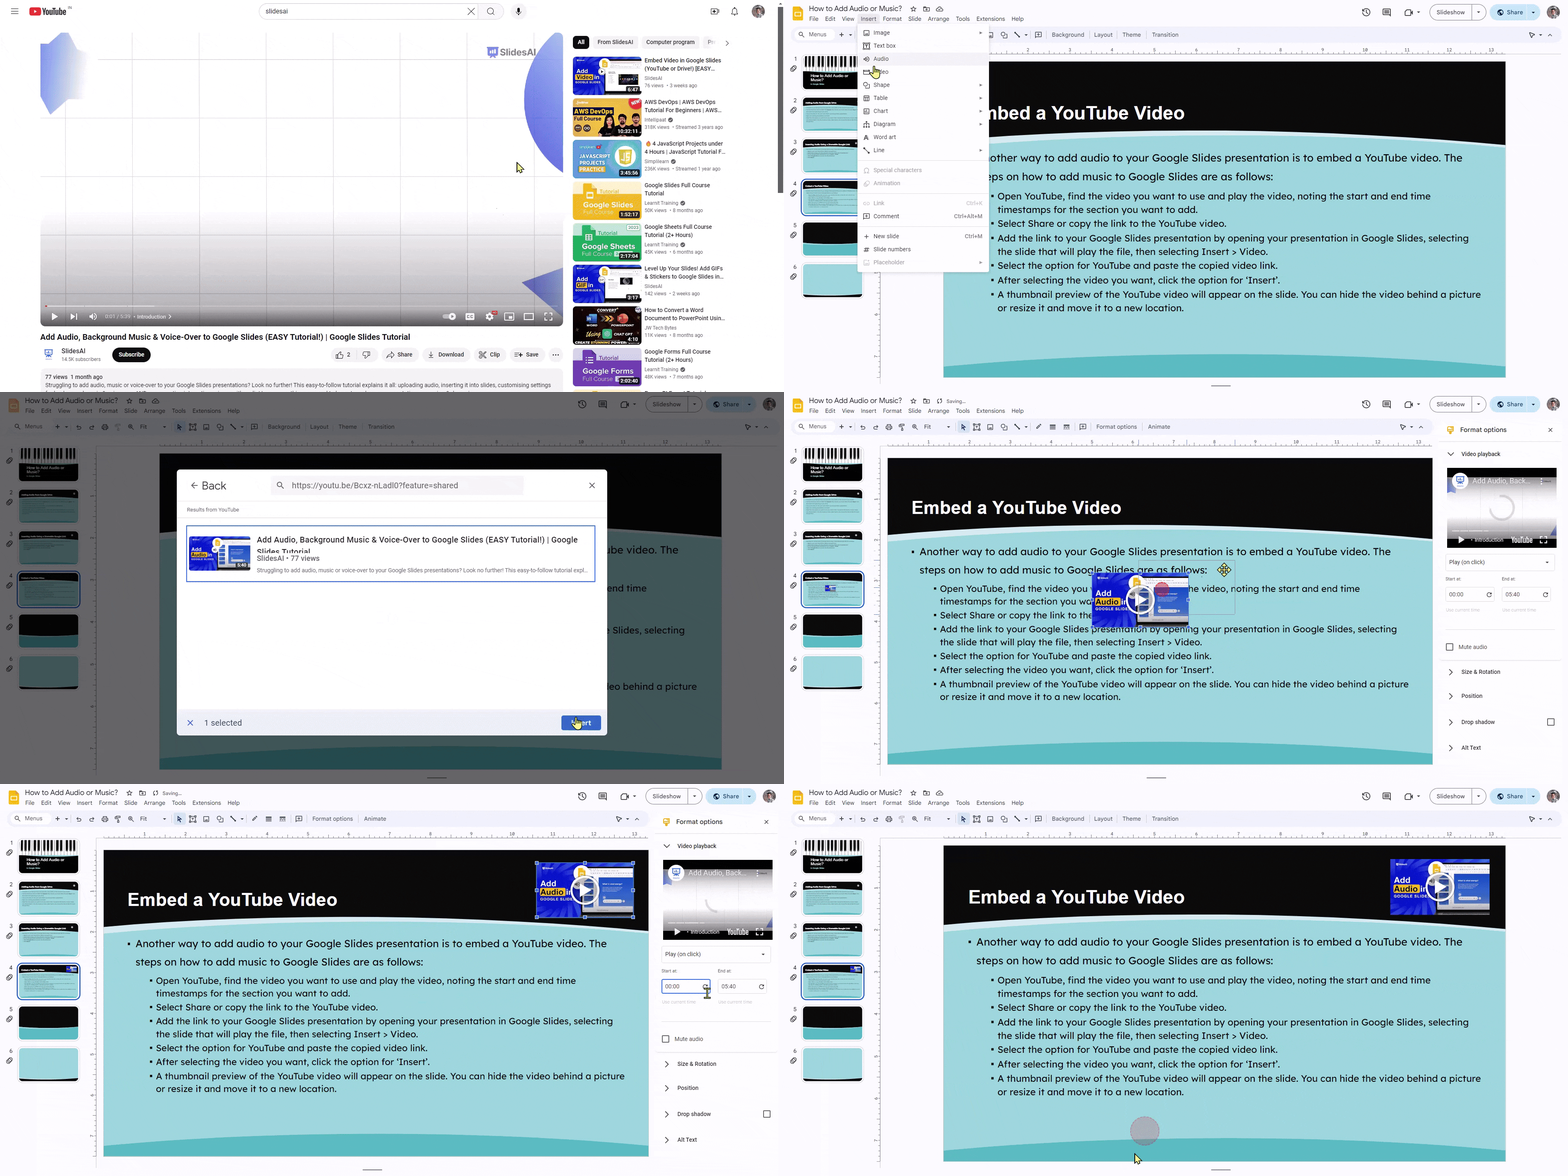
Another way to add audio to your Google Slides presentation is to embed a YouTube video. The steps on how to add music to Google Slides are as follows:
- Open YouTube, find the video you want to use and play the video, noting the start and end time timestamps for the section you want to add.
- Select Share or copy the link to the YouTube video.
- Add the link to your Google Slides presentation by opening your presentation in Google Slides, selecting the slide that will play the file, then selecting Insert > Video.
- Select the option for YouTube and paste the copied video link.
- After selecting the video you want, click the option for ‘Insert’.
- A thumbnail preview of the YouTube video will appear on the slide. You can hide the video behind a picture or resize it and move it to a new location.
Also Read: How to Add Sound Effects to Google Slides?
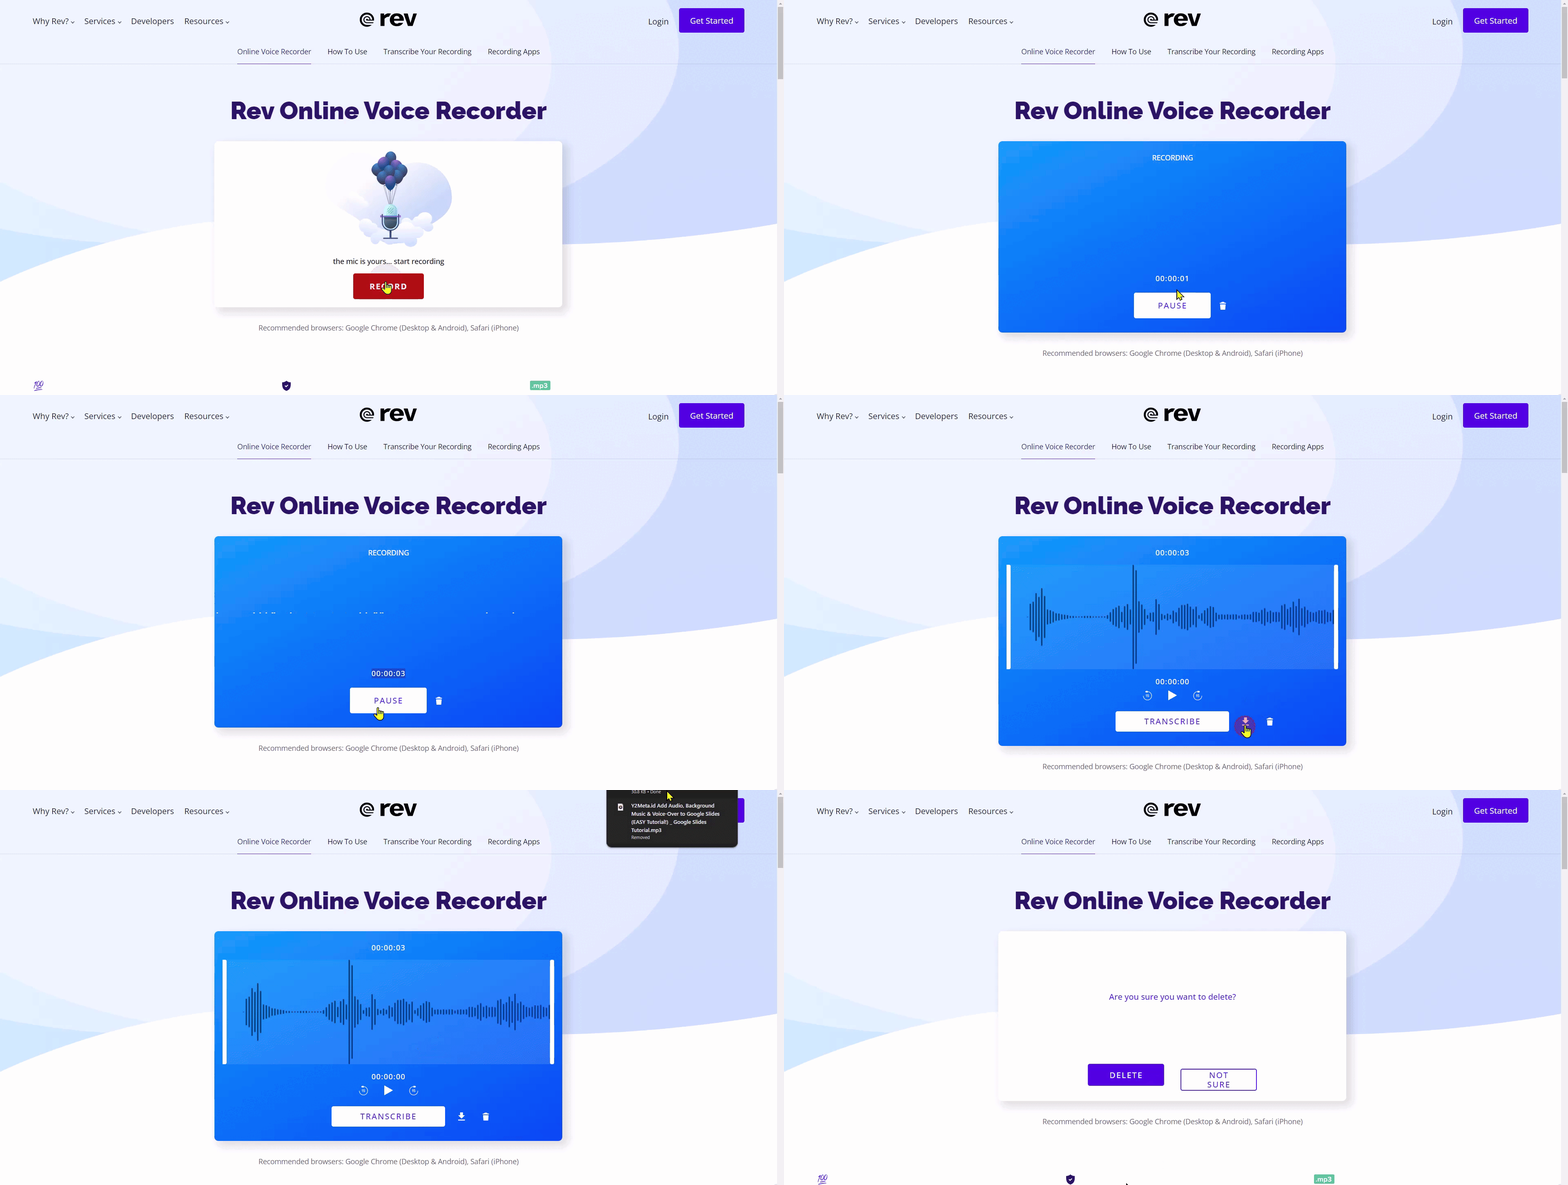
4) Record Audio for Google Slides
You can even learn how to add voiceover to Google Slides! The steps to do so are as follows:
- First, record your audio or narration in your device, and save it as an MP3, AAC, or WAV file, as those formats are acceptable in Google Slides. You can utilize various audio recorder applications to ensure clarity.
- Repeat the steps for uploading an audio file to Google Drive. Then share the file, setting the access permissions to “Anyone with the link can be a viewer.”
- Then, go ahead and click on the slide where you want to add narration, and select the ‘Insert’ option, followed by clicking on the ‘Audio’ option. A speaker symbol will appear, which indicates that the audio has been added to your presentation.
- Select Slideshow to preview your slide in presentation mode and test whether the narration plays as it should.
5) Adding Audio to Google Slides Using your Phone
You can even insert audio from your phone! Regardless of whether you use an iPhone or an Android phone, you can now use your smartphone to add those extra sound effects. The steps to do so are as follows:
- Use a high-quality audio recording app to capture the audio track you want to add to your presentation. Edit your files, and save them to your mobile device.
- Navigate to your Google account on your phone, and go to your Google Drive. Here, press the +New, and upload relevant audio tracks.
- Click on your uploaded audio file in your account, and navigate to sharing permissions. Ensure that the audio track is ‘available for anyone with the link’.
- Use your device to access your presentation document. Here, choose the slide you want to work on. Then select Insert, then the option for Audio, and upload your audio files as needed.
- Click and drag your audio icon where you want it to be positioned in your presentation. If there is any setting you wish to alter or adjust, you can do this by accessing the format options and selecting the option for the playback menu.
<SlidesAICTA1 />
Why Adding Audio to Google Slides Enhances Your Presentation?
The saying “a picture is worth a thousand words” holds even when hosting presentations. Integrating relevant sound elements into your Google Slides opens up a world of possibilities. Here are several reasons why incorporating audio can be beneficial:
- Grabs Attention: Audio engages from the start.
- Elicits Emotion: Sets mood and tone.
- Clarifies Complexities: Aids understanding.
- Suits Different Learners: Appeals to various senses.
- Highlights Key Points: Emphasizes important content.
- Smooth Transitions: Enhances flow between slides.
- Crosses Language Barriers: Benefits global audiences.
- Boosts Interactivity: Supports quizzes and interviews.
- Compelling Storytelling: Narration + visuals leave an impact.
- Adds Personal Touch: Builds presenter-audience connection.
These are all the benefits of adding audio or music to your presentation. However, exactly how to add music to Google Slides? Let us take you through an easy tutorial!
How to Play Audio During The Slideshow?
To play audio during a slideshow, follow these steps:
Step 1: Insert audio
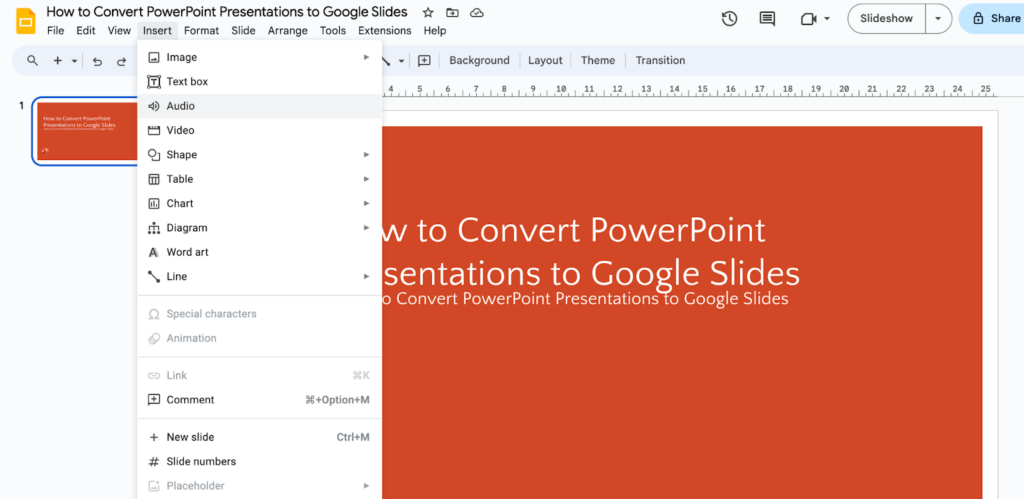
Use the software’s “Insert” or “Audio” option.
Step 2: Select slide and upload
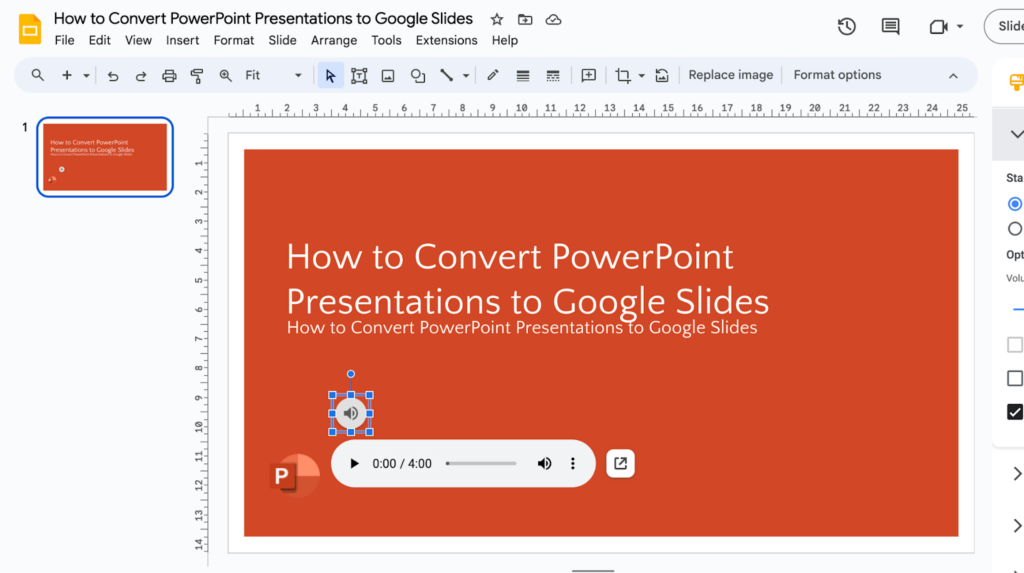
Choose where the audio should play. Add the audio file (e.g., MP3) to the slide.
Step 3: Adjust settings
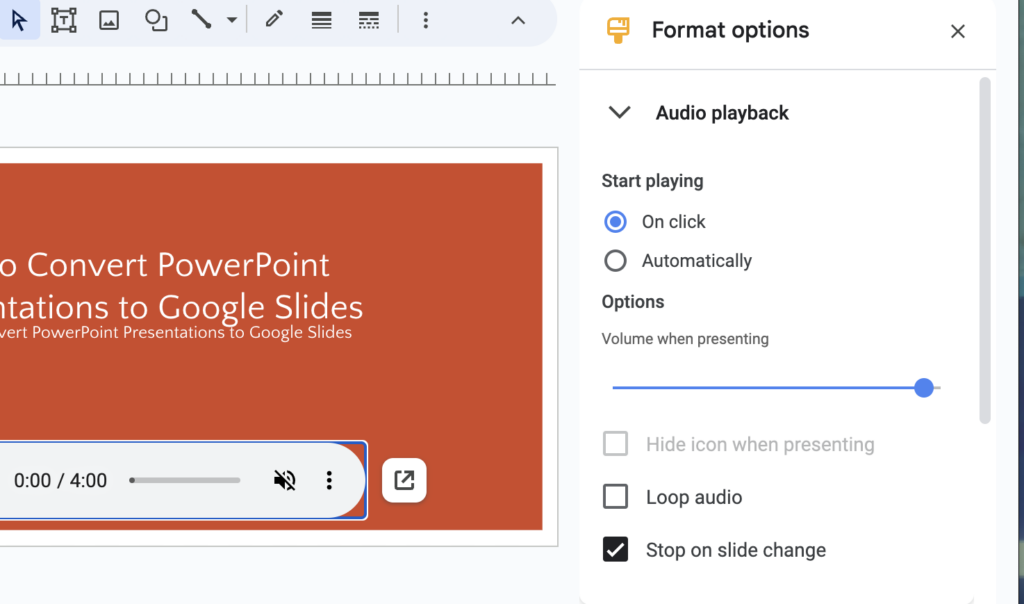
Set autoplay, volume, and loop.
Step 4: Test playback and present

Check the audio during the slideshow run. During the relevant slide, audio will play.
Adding audio is a powerful tool for delivering information, setting a mood, and capturing your audience’s attention. Just how an addition as simple as an audio file can enhance your auditory experience, a powerful AI-driven tool like SlidesAI can take the visual game to the next level!
SlidesAI is an AI presentation maker that enables users to create impressive presentations that compel the audience’s attention and help users present their best. With SlidesAI, you get to experience efficiency, customization abilities, automation, and ease like never before!
Reach out to us and get ready to amp up your presentation game with SlidesAI!
Frequently Asked Questions About Adding Audio or Music to Google Slides
1. How do you delete audio from Google Slides?
To remove audio from your Google Slides presentation, go to the slide with the audio, click on the speaker icon, right-click on the icon, and select “Delete” from the drop-down menu.
2. What audio formats do Googlea Slides support?
Google Slides supports MP3, WAV, OGG, and AAC audio formats.
3. Can I add narration to my slides?
Yes! You can use the “Record Audio” option under Insert > Audio to narrate directly within your presentation. Or, you can pre-record your narration, upload it on Google Drive, and insert that audio in your file.
4. Can I add multiple audio files to one presentation?
Absolutely! You can add as many audio files as you need to different slides or even have them overlap. You can follow the steps given in the above article to upload multiple audios for each slide of your presentation.
5. How do I control when the audio starts playing?
You can choose options like “Start playing automatically” or “Only when I click” under Playback options in the Audio sidebar, to control the speed and start and stop point of your audio.
6. Can I adjust the audio volume during the presentation?
Yes, you can! Try using the volume slider in the Audio sidebar or set a specific volume level in the Playback options.
7. Can I hide the audio icon during the presentation?
Yes, you can do so by enabling the “Hide icon when presenting” in the Playback options for a cleaner look.
8. Can I add audio from the web directly to Google Slides?
Unfortunately, this feature is not available yet. You need to upload the audio file or link to Google Drive first. But you can add audio directly from famous streaming platforms like YouTube or Spotify to your Google Slides presentation, provided that the audio is made shareable by the authors of the video or audio files.
9. How do I edit the audio file after adding it to my presentation?
You cannot directly edit the audio within Google Slides. Try to use an audio editing tool before uploading the files to Google Drive, and then to your presentation.
10. Can I add sound effects or transitions between audio clips?
This functionality is not currently built-in, but you can achieve similar effects using third-party add-ons.
11. How do I fade in/out audio in Google Slides?
This is not directly possible, but workarounds using multiple audio clips with adjusted volume levels can be used.
12. Can I add audio to a specific part of a slide?
No, the audio plays for the entire slide duration. You can adjust the playback, volume, and loop settings in the playback format menu.
13. Can I loop the audio or stop it on specific slides?
Yes! You can click on “Loop audio” or set “Stop audio on slide change” in the Playback options, to loop your audio for certain slides, and control the playback speed.


