
Dotted lines are a simple way to make your PowerPoint slides clearer and more professional. You can use them to connect shapes, highlight important areas, or add style to your design. In this guide, we’ll show you easy steps to draw and customize dotted lines in PPT so your presentations look clean and polished.
Where Can You Use Dotted Lines in PowerPoint?
Dotted lines can help make your slides look clean, organized, and easy to follow. They’re great for adding structure or drawing attention without making your design feel too heavy. Here are some common ways to use dotted lines in PowerPoint:
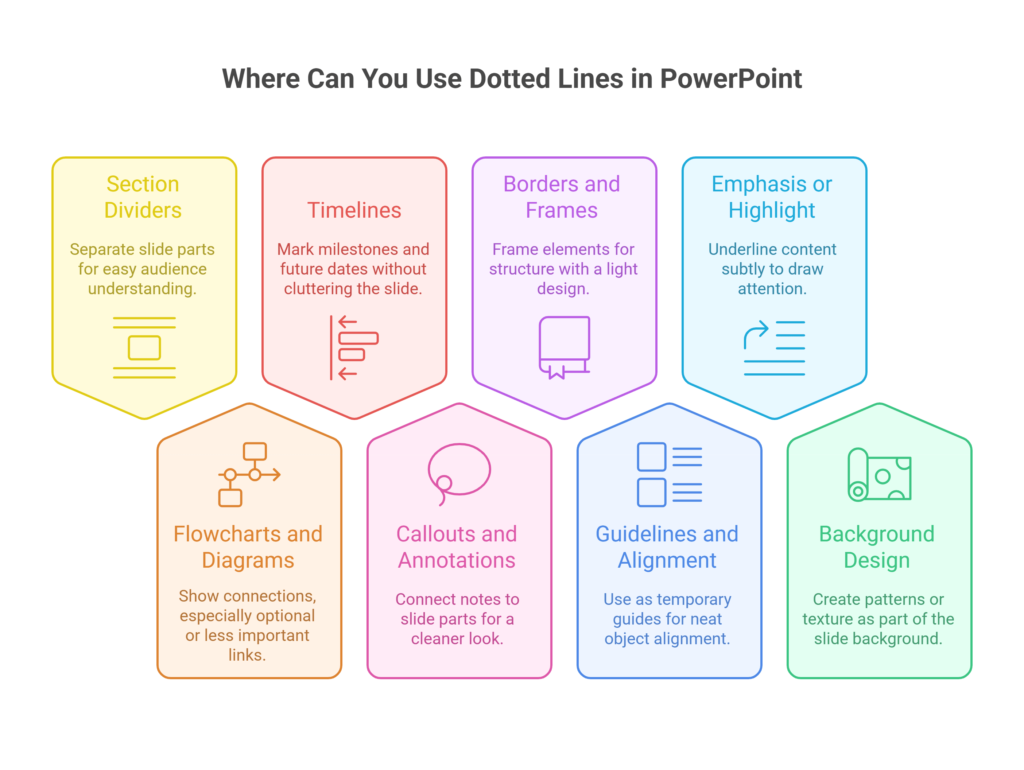
1. Section dividers
Use dotted lines to separate different parts of a slide so your audience can easily see where one section ends and another begins.
2. Flowcharts and diagrams
Show connections or relationships with dotted lines — great for optional paths or links that aren’t as important as the main ones.
3. Timelines
Add dotted lines to mark milestones, phases, or future dates without making the slide look too busy.
4. Callouts and annotations
Connect notes, callouts, or explanations to certain parts of your slide using dotted lines for a cleaner look.
5. Borders and frames
Frame text boxes, images, or sections with dotted lines to add structure while maintaining a light design.
6. Guidelines and alignment
Use dotted lines as temporary guides to help line up objects neatly while you’re designing (and delete them before presenting).
7. Emphasis or highlight
Underline or box important content with dotted lines for a soft, subtle way to draw attention.
8. Background design
Create patterns or texture by adding dotted lines as part of your slide’s background.
Also Read: How to Make the Background More Appealing in Slides
<SlidesAICTA4 />
Step-by-Step Guide on How to Draw a Dotted Line in PPT
Adding a dotted line in PowerPoint is easy and can help make your slides look more polished and organized. You can use these lines to connect elements, divide sections, or add a creative touch to your design. Just follow these simple steps:
Step 1: Open Microsoft PowerPoint and either start a new presentation or open one you’ve already made.
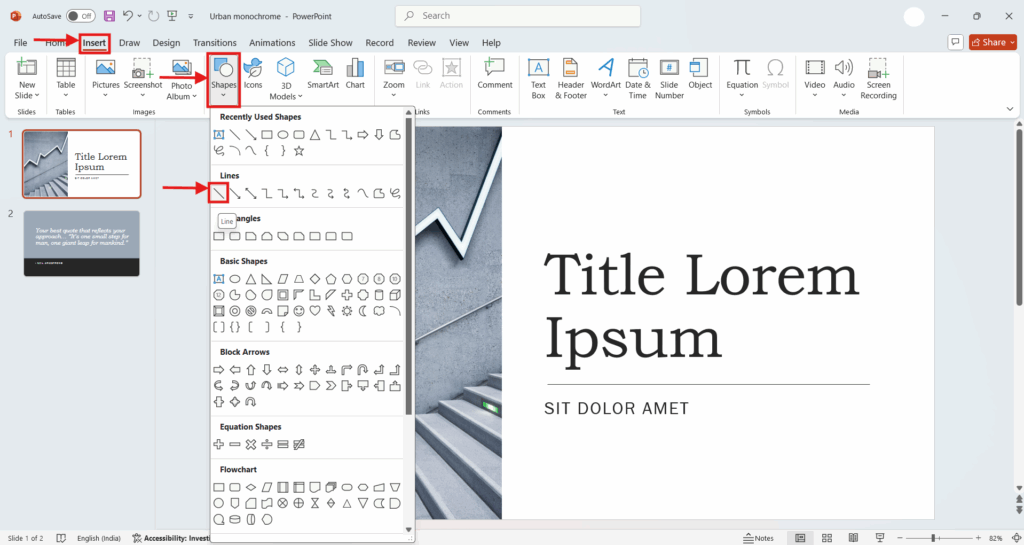
Step 2: Click on the Insert tab at the top of the screen.
Step 3: Click Shapes and pick the straight Line from the Lines section.
Step 4: Click and drag on your slide to draw the line.
(Tip: Hold down the Shift key while dragging to make sure the line stays straight.)
Step 5: Click on the line to select it.
Step 6: Go to the Shape Format tab that appears in the menu.
Step 7: Click Shape Outline, hover over Dashes, and choose a dotted or dashed style you like.
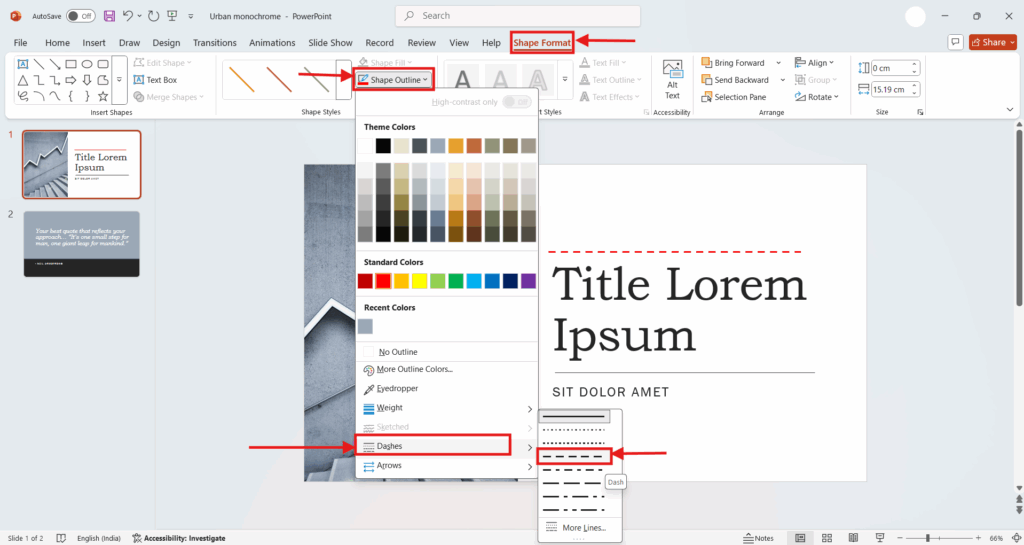
Step 8: To change the thickness of the line, go to Shape Outline > Weight and pick the width that looks best.
Step 9: To change the color of the line, go to Shape Outline > Theme Colors or More Outline Colors and choose what you want.
Step 10: Move or resize the dotted line on your slide as needed.
<SlidesAICTA5 />
Design Tips for Using Dotted Lines in PowerPoint
Dotted lines can make your slides look clean and professional when used the right way. Here are some simple tips to help you design with dotted lines without making your slides feel too busy.
1. Choose the right thickness
Go with thin lines (1–2 pt) if you want a light, clean look. Thicker dotted lines can make the slide look crowded.
2. Pick matching colors
Choose colors that fit your slide’s theme. Grays and softer colors usually work well for dotted lines so they don’t steal attention.
3. Keep lines straight
Hold the Shift key while drawing to make sure your lines are perfectly straight, whether horizontal or vertical.
4. Stick to one style
Use the same dotted or dashed style throughout your presentation. This keeps everything looking neat and consistent.
5. Don’t overdo it
Use dotted lines only where they really help, like for separating sections or pointing out something important. Too many lines can make your slide messy.
6. Line up with your content
Make sure your dotted lines align with text, shapes, or images so your slide looks clean and well-organized.
7. Group with other objects
If a dotted line is part of a diagram or label, group it with the related shape or text so you can move them together easily.
Also Read: How to Group Objects in PowerPoint
8. Check visibility
Look at your slides on different screens to make sure the dotted lines are easy to see but not too bold.
9. Use dotted arrows for flow
When showing a process or flow, dotted arrows can guide the viewer’s eye without making the slide feel heavy.
10. Mix with solid lines carefully
You can use both solid and dotted lines for contrast, but don’t mix too many styles — keep it simple so it’s easy to follow.
<SlidesAICTA4 />
Conclusion
To draw a dotted line in a PPT is a great way to add style, structure, and clarity to your PowerPoint slides without making them look cluttered. By following these easy tips and steps, you can use dotted lines to make your presentations cleaner, more organized, and easier for your audience to follow. With the right design choices, even small details like dotted lines can make a big difference.
Frequently Asked Questions About Dotted Lines in PowerPoint
Can I make vertical or diagonal dotted lines in PowerPoint?
Yes! Just draw the line in the direction you want, up, down, or at an angle, and then apply the dotted style like you would for any line.
Can I use dotted lines in PowerPoint charts or tables?
You can! Select the borders or gridlines in your chart or table, then go to the Format options and pick a dotted style for the lines.
How can I make a dotted line thicker or thinner in PowerPoint?
Click on the line, go to Shape Outline > Weight, and choose the thickness you like. You can also adjust the Dashes setting if you want to change how the dots look.
How do I remove a dotted line in PowerPoint?
It’s easy, just click on the line and press Delete, or right-click and choose Cut to take it off your slide.
Related Posts
-

Insert Emojis in your Google Slides to take your presentation to the next level! Emojis…
-

When making a presentation or a slide, using images is crucial, even in educational settings.…
-

{ “@context”: “https://schema.org/”, “@type”: “BreadcrumbList”, “itemListElement”: [{ “@type”: “ListItem”, “position”: 1, “name”: “Home”, “item”: “https://www.slidesai.io/”…
-

{ “@context”: “https://schema.org”, “@type”: “BlogPosting”, “mainEntityOfPage”: { “@type”: “WebPage”, “@id”: “https://www.slidesai.io/blog/how-to-hide-a-slide-in-google-slides” }, “headline”: “How to…
-

{ “@context”: “https://schema.org”, “@type”: “Article”, “mainEntityOfPage”: { “@type”: “WebPage”, “@id”: “https://www.slidesai.io/blog/how-to-add-stickers-in-google-slides” }, “headline”: “How to…