
You can curve text in Google Slides by using text box rotation, Word Art styling, or external design tools to mimic a curved text effect. While Google Slides does not include a built-in feature specifically for curving text, there are several simple workarounds that allow you to create similar visual results.
The easiest method is usually creating curved text with external tools and inserting it into Google Slides. In this guide, we’ll explore the most effective ways to curve text in Google Slides and walk through each method step by step.
Methods to Curve Text in Google Slides
There are several ways to add curved text to your Google Slides, even without a built-in feature. Here are two simple methods to help you achieve this effect.
Method 1: Add Curve Text in Google Slides using PowerPoint
Here’s a simplified guide to adding curved text in Google Slides using PowerPoint:
1. Create the Curved Text in PowerPoint:
- Insert a Text Box: Go to the “Insert” tab, select “Text Box,” and draw a box on your slide.
- Type Your Text: Input the text you want to curve.
- Apply the Curve Effect:
- Select the text.
- Go to the “Format” tab.
- Under “Text Effects” or “Text Options,” choose “Transform.”
- Pick a curve style, such as “Arc Up” or “Arc Down.”
- Adjust the curve’s intensity by dragging the yellow handle (if available).
- Customize the Text: Modify font, size, and color to fit your design.

2. Copy the Curved Text to Google Slides:
- Select and Copy: Highlight the curved text box and press Ctrl+C or right-click to copy.
- Paste into Google Slides: Open your Google Slides presentation, click on the slide where you want the text, and press Ctrl+V or right-click to paste.

3. Adjust the Text in Google Slides:
- Position and Size: Move and resize the pasted text box to fit your slide layout.
- Formatting Limitations: Keep in mind that the pasted text might not be fully editable in Google Slides. You may need to re-create the curve or make minor adjustments within PowerPoint.
Tips:
- Experiment with Different Curves: Try various curve styles to achieve the desired effect.
- Consider Text Readability: Ensure the curved text is still easy to read, especially for smaller text sizes.
- Check for Compatibility: While this method generally works well, be aware that specific formatting or effects might not transfer perfectly between PowerPoint and Google Slides.
<SlidesAICTA1 />
Also Read – How to Make a Word Cloud in Google Slides?
Method 2: Create and Add Curved Text Using Design Tools
Here are a few popular design tools you can use to create and add curved text to your Google Slides presentations:
1. Canva

- Create a New Design: Start by opening Canva and creating a new design. Choose a custom size that suits your needs.
- Find a Curved Text Template: Search for “Curved Text” in the templates section. Select a template with a white background to ensure a clean export.
- Customize Your Text: Replace the placeholder text with your desired message.
- Export as PNG: Download your design as a PNG image.
- Insert into Google Slides: Open your Google Slides presentation, click on “Insert,” select “Image,” and upload your downloaded PNG file.

2. Mockofun

- Create an Account: Sign up for a free Mockofun account.
- Design Your Text: Click on “Create New” and choose the “Text” option. Select the “Curved Text” style and customize your text.
- Export as PNG: Download your design as a PNG image.
- Insert into Google Slides: Follow the same steps as in Canva to insert the PNG into your Google Slides.

3. InkPX
- Access the Curved Text Generator: Open the InkPx Curved Text Generator.
- Customize Your Text: Input your desired text and choose from various customization options like font, size, color, and curve intensity.
- Download as PNG: Download the generated image as a PNG file.
- Insert into Google Slides: Follow the same steps as in Canva and Mockofun to insert the PNG into your Google Slides.

Read Related – How to Make a Google Slides Font Metallic?
Method 3: Curve Text in Google Slides Using Google Drawings
If you prefer not to use third-party tools, Google Drawings is a simple option to create curved text manually. Although it doesn’t provide a direct curve effect, you can rotate and arrange letters to form a curved shape.
Here’s how to do it:
Step 1: Open Google Drawings
Go to Google Drawings and create a new blank drawing.
Step 2: Insert Word Art
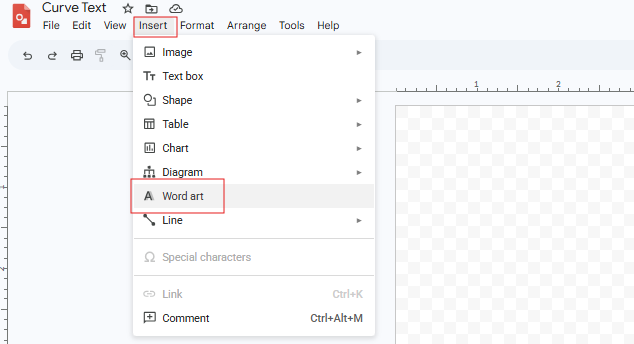
Click Insert → Word Art, then type the text you want to curve and press Enter.
Step 3: Open Format Options
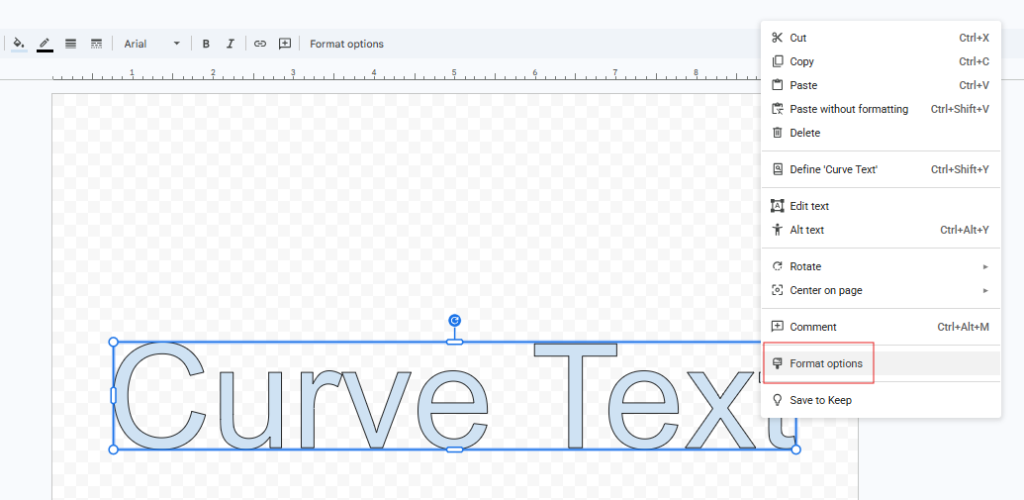
Right-click on the Word Art and select Format options.
Step 4: Rotate the Letters
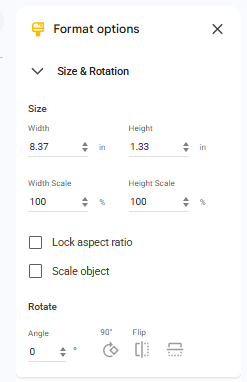
Use the Size & Rotation settings to rotate the text slightly. You can also duplicate letters and rotate them individually if you want a smoother curve.
Step 5: Arrange the Text into a Curve
Drag and position each letter manually to form a curved layout.
Step 6: Download the Curved Text
Once your curved text looks the way you want, go to File → Download → PNG image.
Step 7: Insert into Google Slides
Open your Google Slides presentation, click Insert → Image → Upload from computer, and add the PNG file.
Method 4: Add Curve Text in Google Slides using Text box Rotation
Step 1: Go to Google Slides and open the presentation where you want to add curved text.
Step 2: Click Insert > Text box, draw a small box on the slide, and type a single letter. Repeat this for every letter in your text.
Step 3: Place the text boxes side by side in a rough arc or curve shape.
Step 4: Click on a letter, then grab the circular rotation handle at the top and rotate it slightly. Letters at the left edge of the curve should tilt left, letters at the right should tilt right, and the center letter stays upright. The further a letter is from the center, the more you rotate it.
Step 5: Zoom in to adjust the position and rotation of individual letters until the curve looks smooth and even.
Step 6: Once you’re happy with the result, select all the letter text boxes (click one, then Shift+click the rest, or drag to select all), right-click, and choose Group. This locks them together so you can move or resize the curved text as a single element.
Skip manually arranging and rotating letters. Create professionally designed slides with custom text effects using SlidesAI’s AI presentation maker web app.
Troubleshooting Curved Text in Google Slides
1. The curved text looks uneven or lopsided
This usually happens when the rotation angles are not gradual enough between letters. Go back and adjust each text box so the rotation increases evenly from the center outward. A good starting point is 5 to 10 degrees per letter as you move away from the center.
2. The letters are overlapping or too far apart
Zoom in to at least 150% before spacing your letters. Small gaps and overlaps that look fine at 100% become obvious on a big screen. Nudge individual text boxes using the arrow keys for more precise control.
3. The pasted image from PowerPoint looks blurry
Export your design at the highest resolution available. In Canva, choose PNG over JPG. In PowerPoint, right-click the curved text, save it as a picture, and make sure the resolution is set to a higher DPI before inserting it into Google Slides.
4. The curved text disappeared after sharing the file
If you used the PowerPoint method, the curved text may not render correctly when someone opens the file in Google Slides for the first time. To avoid this, convert it to an image before inserting — that way it stays intact regardless of who opens the file or on what device.
5. The grouped text boxes came ungrouped on their own
This can happen if you cut and paste the group rather than moving it directly. If you need to reposition the curved text, click and drag the group instead of using cut and paste. If it does ungroup, select all the letters again and regroup them.
6. The curved text does not match the rest of the slide’s font
When using Canva or other external tools, the font you used there may not match exactly what you have in Google Slides. Pick a Google Font that is available in both tools, such as Montserrat, Lato, or Open Sans, to keep things consistent.
7. Google Drawings rotated the letters, but the result looks mechanical
The manual rotation method in Google Drawings works best for short words. If your text is longer than 5 to 6 characters, the result can look stiff. In that case, switch to Canva or InkPX, where the curve is applied automatically and looks much more natural.
Looking for more creative slide designs? Explore our collection of Google Slides templates.
Closing Thoughts
While Google Slides doesn’t have a native curved text feature, you can easily achieve the effect using workarounds like PowerPoint or online design tools. Experiment with these methods to add a unique touch to your presentations, ensuring your text stands out while maintaining readability.
<SlidesAICTA1 />
Frequently Asked Questions Related to Curving Text in Google Slides
Does Google Slides have a built-in feature for curved text?
Google Slides doesn’t have a built-in feature for curving text.
Can I edit curved text pasted from PowerPoint in Google Slides?
The pasted text might not be fully editable in Google Slides.
What design tools can help create curved text for Google Slides?
You can use Canva, Mockofun, or InkPX to design curved text and insert it as a PNG.
What is the final step after creating curved text in a design tool?
Insert the downloaded PNG into Google Slides using the image upload feature.
Why should I consider readability when using curved text?
Ensure the curved text is still easy to read, especially for smaller text sizes.
Are there curved text effects in Google Slides?
Google Slides doesn’t have a built-in curved text feature. You’ll need to create it outside the app using a tool like Canva or PowerPoint, then bring it in as an image.
Does Curved text affect the responsiveness of Google Slides presentations?
Curved text does not significantly affect the responsiveness or performance of Google Slides presentations.
What fonts work best for curved text?
Bold, clean, and easy-to-read fonts work best for curved text. Sans-serif fonts like Arial, Montserrat, Poppins, and Open Sans usually give the best results.
Will these tricks work on the Google Slides mobile app?
Some basic edits may work on the mobile app, but advanced curved text methods are easier and more reliable on the desktop version of Google Slides.
When should you use Curved Text in Google Slides?
Use curved text for titles, logos, badges, infographics, invitations, or any design where you want text to look more creative and visually engaging.
Related Posts
-

Working with multiple slides at once in Google Slides can save you a lot of…
-

When preparing for a presentation, it’s often helpful to provide your audience with handouts that…
-

{ “@context”: “https://schema.org”, “@type”: “FAQPage”, “mainEntity”: [{ “@type”: “Question”, “name”: “Why should I time my…
-

If you see the “Error Rendering Shape” message while trying to insert an image into…
-

Highlighting text is a common technique used to emphasize key points or draw attention to…