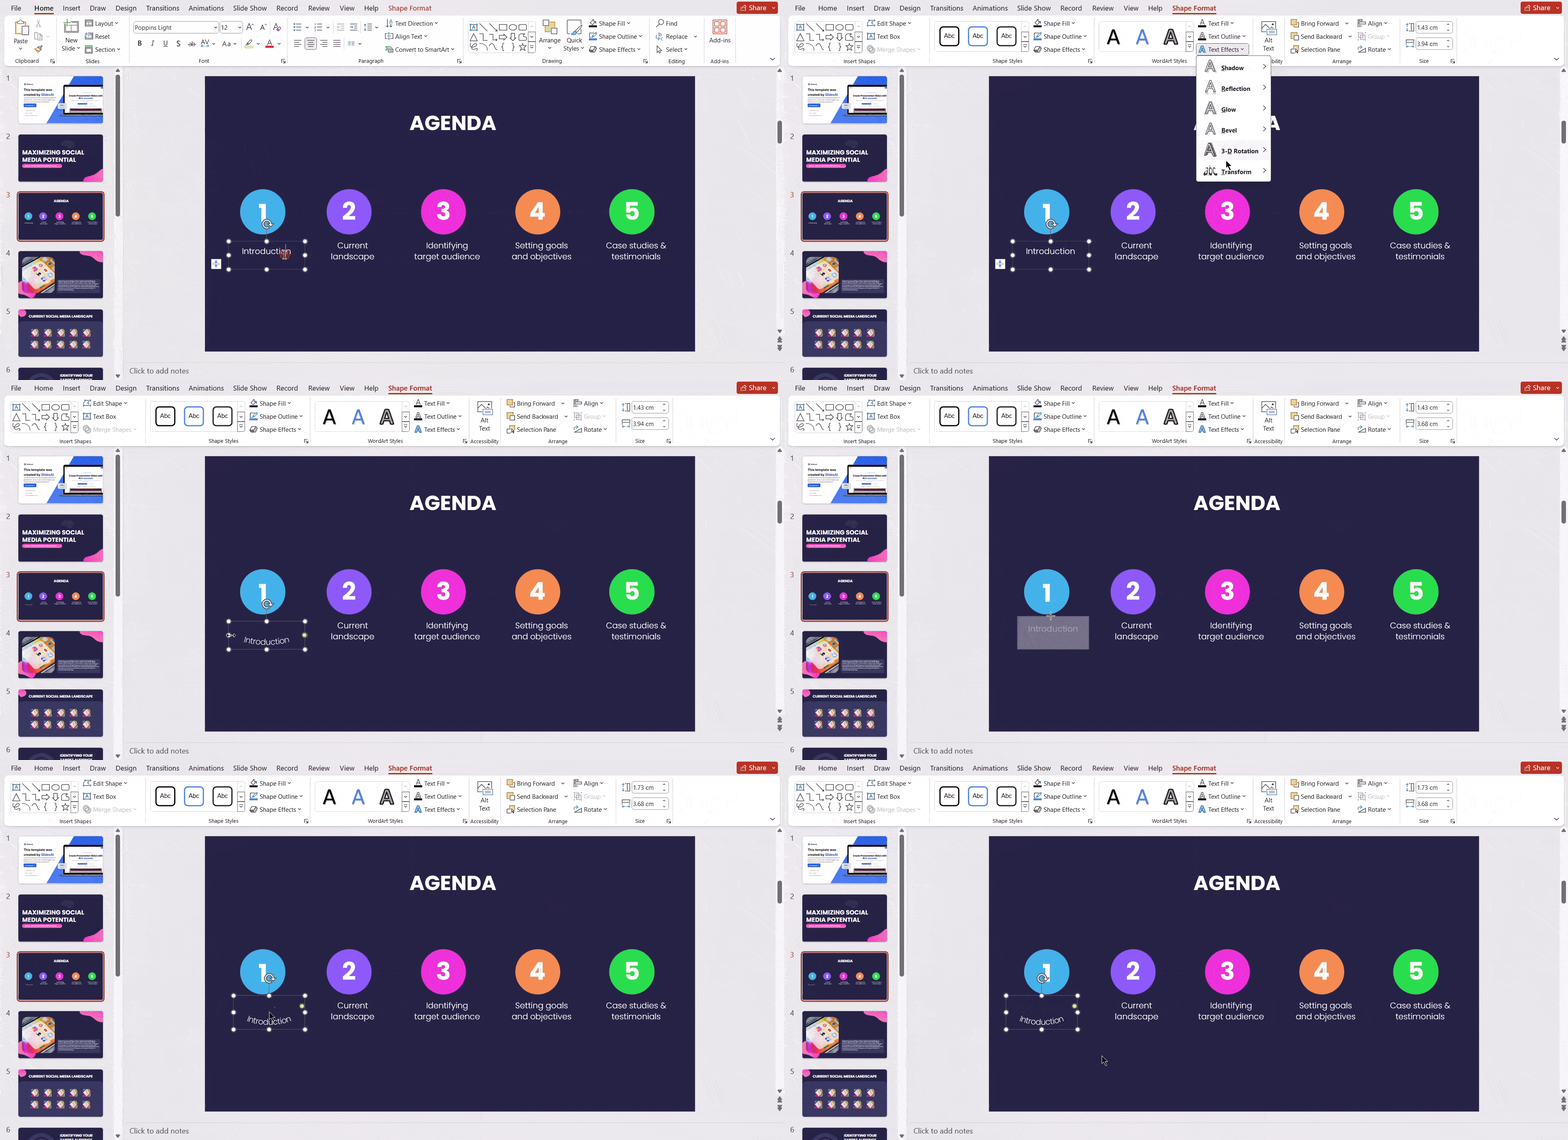
Adding creative design elements to your slideshow presentations can make them more visually appealing. Curved text is one such element that’s both simple and eye-catching. If you often use PowerPoint to create professional slideshows, incorporating curved text can make your presentations look better and keep your audience interested.
In this article, we’ll explain what curved text is, talk about when it’s a good idea to use it, give you step-by-step instructions for adding it to your slides, and share some extra design tips for making your PowerPoint presentations stand out.
What is Curved Text in PowerPoint?
Curved text in PowerPoint refers to text that’s been formatted to follow a curve instead of staying in a straight line. This can add a decorative touch to your slides and make them more visually interesting. You can curve your text in various ways such as:
- Upward Curve: With upward-curved text, words or phrases rise from the baseline, reach a peak, and then come back down. This creates an arch or rainbow-like shape, adding a bit of flair to the text.
- Downward Curve: Text that curves downward starts from the baseline, dips down, and then comes back up. This gives it a sort of bowl shape, making it look different from regular text.
- Circular Curve: Circular curved text starts from a point and goes around in a circle, ending back where it started. It usually curves upward, making it easier to read and giving it a neat circular pattern.
<SlidesAICTA1 />
7 Simple Steps to Make Curved Text in PowerPoint
- Select Your Text: Choose the text you want to curve, whether it’s already on your slide or inside a text box you created.
- Shape Format Tab: Click the “Shape Format” tab on the ribbon (or “Drawing Tools Format” in older versions).
- Text Effects: Locate the “Text Effects” button and click on it. This opens a menu with various options to transform your text.
- Navigate to the Transform Section: Look for the “Transform” section within the menu. Here, you’ll find options to curve your text in different ways:
- Preset Curves: These are quick options like “Arch Up” or “Circle” that instantly bend your text into those shapes.
- Other Effects: Explore options like “Wave” or “Inflate” for more creative curves.
- See It First: Hover over each effect name to see a live preview of how it will curve your text.
- Make it Perfect: Once you choose an effect, you might be able to drag adjustment points to fine-tune the curve.
- Final Touches (Optional):
- Font Size: Depending on the curve, you might need to adjust the font size to ensure all the text fits comfortably.
- Experiment: Play around with different effects and adjustments to achieve the desired look.

Why Opt for PowerPoint Curve Text?
Here’s why you should opt for PowerPoint curve text:
- Connecting Images: Curved text can also help explain what an image is showing. For example, if there’s a picture of an arrow in a circle, adding text that follows the curve of the arrow or matches its circular motion can highlight the idea of something repeating in a cycle. This makes it easier for your audience to understand and keeps them engaged with your presentation.
- Emphasize Logos: Curve text around your brand logo for a distinctive look.
- Improving Visual Presentation: When a large image dominates a slide, adjusting the text layout to wrap around it ensures both the image and accompanying text remain visible and captivating. Using the wrapping technique is a great way to create visually appealing slides that combine text and images seamlessly.
- Adding Flair to Subtitles: In PowerPoint presentations, subtitles are just as important as titles in other business documents. While titles are typically presented in a straight line, incorporating curved text to subtitles can give your slides a stylish touch. Using curved text in your PowerPoint presentation can instantly grab your audience’s attention.
<SlidesAICTA2 />
Closing Thoughts
Adding curved text to your PowerPoint presentations is an easy technique that can make them look more visually interesting. Upward, downward, and circular curves can all be used effectively to enhance your slides. Curved text can help you clarify the content of images, emphasize your logo, and improve the overall look of your presentation. It’s a versatile tool that can be used for titles, subtitles, and even to connect with your audience. So, feel free to give curved text a try and see how it can improve your presentations!
Frequently Asked Questions
Can I curve text around a specific shape?
While PowerPoint doesn’t directly curve text around shapes, you can achieve a similar effect using WordArt and some additional steps.
Are there any other ways to create curved text?
While the Transform effect with WordArt offers the most control, some users find success by:
Creating a curved path with the “Drawing Tools” and then using the “Text Box” function to fit text along the path.
How to make a text circle in PowerPoint?
Use the “Circle” option under Transform effects in WordArt and adjust the text size and box size for a complete circle.
How to curve text in PowerPoint 2010 (or older version)?
The process remains similar.
- Insert WordArt: Use the “Insert” tab and choose “WordArt” to create a text box.
- Transform Text: Type your text and right-click the WordArt box. Select “Format Shape” > “Text Effects” > “Transform.”
- Choose a Curve: Pick an effect like “Arch” or “Circle” to curve your text. Adjust the shape size and text position for best results.
How to curve text in PowerPoint on Mac?
- Insert a WordArt box (Insert > WordArt).
- Choose your WordArt style.
- Type your text.
- Right-click & format the WordArt (Text Effects > Transform).
- Pick your curve effect (“Arch” or “Circle”).


