
Creating a poster in PowerPoint is a simple and convenient way to design eye-catching visuals for events, presentations, or projects. With its easy-to-use tools and flexible layout options, PowerPoint allows you to customize your poster’s size, add images, text, and graphics, and make it look professional, all without needing advanced design skills. Whether you’re a student, teacher, or professional, PowerPoint makes poster creation accessible and efficient.
How to Make a Poster in PowerPoint?
Making a poster in PowerPoint is straightforward and doesn’t require any special design software. You can customize everything from the size to the colors and fonts to create a poster that fits your needs perfectly. Here’s a simple step-by-step guide to help you design an effective poster using PowerPoint.
Method 1: Create a Poster Using PowerPoint’s Designer Feature
PowerPoint’s Designer feature makes creating a poster quick and easy, especially if you have a Microsoft 365 subscription. It offers smart layout suggestions and colorful templates, helping you design a professional-looking poster without starting from scratch. Here’s how you can use it step-by-step:
Step 1: Start with a Blank Slide
Open PowerPoint and choose Blank Presentation to get a fresh canvas where you can build your poster.
Step 2: Choose a Poster Template
Head over to the Design tab, and in the Themes bar, pick a template you like. For more creative options, click on Designer in the top-right corner (available only for Microsoft 365 users).
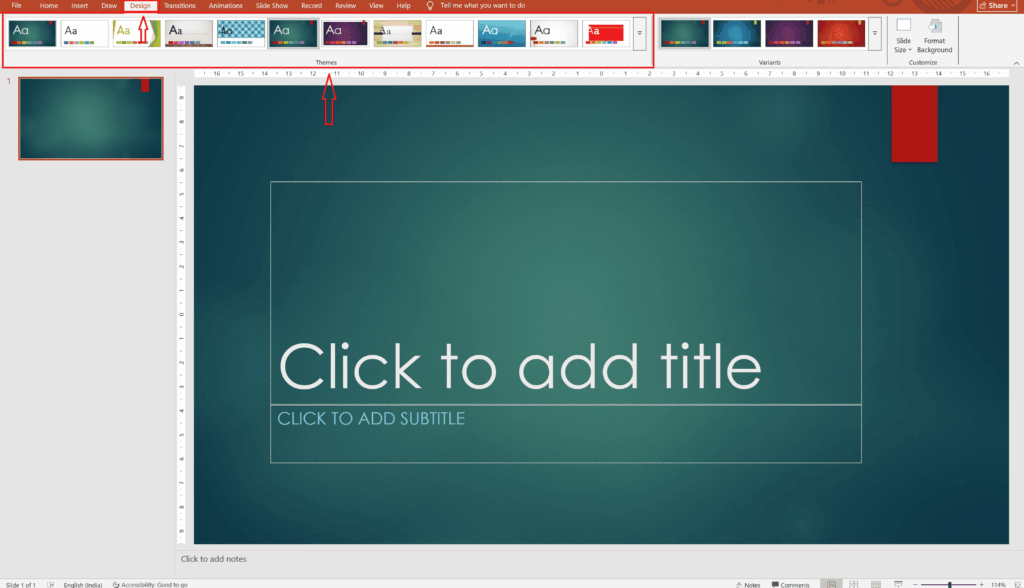
Step 3: Adjust Slide Size and Orientation
Still under the Design tab, click Slide Size > Custom Slide Size. Select a poster size that fits your needs. The common sizes include 11 x 17, 18 x 24, or 24 x 36 inches. Click OK and choose Ensure Fit when prompted.

Step 4: Select a Background
Click Format Background and pick a subtle color, gradient, or image that suits your poster’s theme. Keep the background clean to make your main message stand out.

Step 5: Design Your Poster
Focus on visual hierarchy by making the most important info bold and clear. Use plenty of white space to keep things neat and easy to read. You can add icons via Insert > Icons to make your design more appealing.

Step 6: Add a Title and Headings
Insert a Text Box to add your poster’s title using a large, readable font placed prominently. Use bullet points or short paragraphs to break up supporting text and keep it tidy.
Step 7: Add Visuals
Add pictures via Insert > Pictures or diagrams with SmartArt. Customize these visuals by resizing or adding shapes to highlight key areas.

Step 8: Final Touches
Check that everything is aligned and consistent, and proofread your text carefully. It’s always helpful to get someone else to review your poster to catch any mistakes or confusing parts.
<SlidesAICTA1 />
Read Related – How to Make a Collage in PowerPoint
Method 2: Using PowerPoint Poster Templates
If you want a quicker way to create a poster, using one of PowerPoint’s built-in templates is a great option. These templates are professionally designed and easy to customize, making them ideal for academic, business, or event posters. Here’s how to get started:
Step 1: Open PowerPoint
Launch PowerPoint on your computer and click on “New” to create a fresh presentation.
Step 2: Search for a Poster Template
In the search bar, type “poster” and hit Enter. Browse through the available templates and pick one that fits your project, whether it’s for a seminar, event, or research.

Step 3: Select and Open the Template
Once you find a template you like, click on it and hit “Create” to open it in a new window.

Step 4: Customize the Poster Content
Replace the placeholder text with your details. You can add your title, key points, images, or even graphs and charts to match your content needs. Use Insert > Pictures to include visuals from your device.

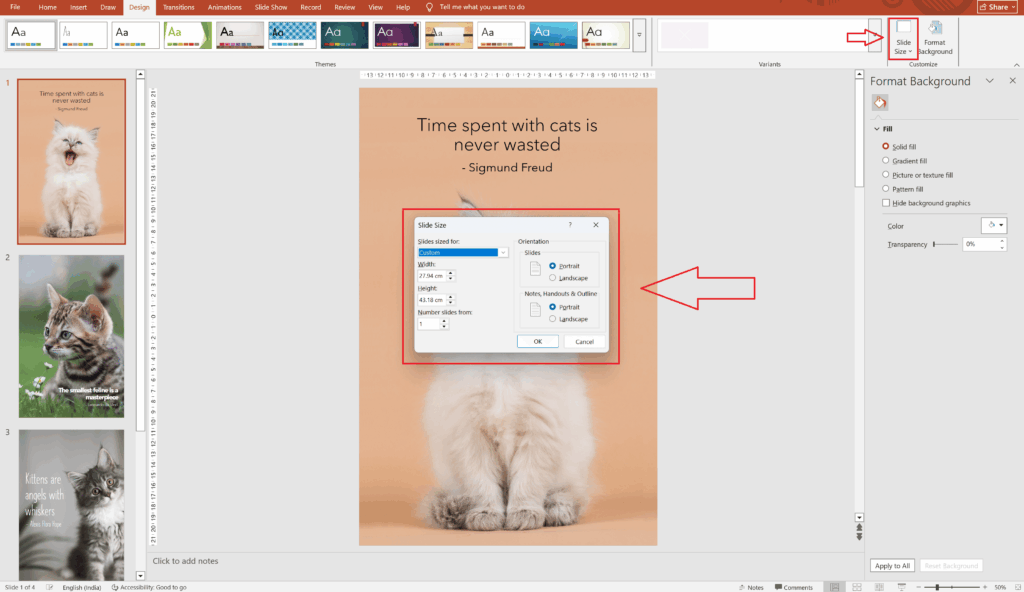
Step 5: Adjust Layout and Design
You can tweak the design by changing background colors, fonts, and text box placements. Just head to Design > Format Background to personalize it.

Step 6: Set the Poster Size (Optional)
If the default size doesn’t suit your needs, go to Design > Slide Size > Custom Slide Size and pick a dimension like 24 x 36 inches or A3/A4. Click OK and choose Ensure Fit when prompted.
Step 7: Review Your Poster
Take a final look to make sure everything’s aligned, easy to read, and visually clear. Zoom in if needed to double-check text size and image quality.
Step 8: Save and Export
Once you’re happy with the design, go to File > Save As to keep your work. To print or share digitally, export it as a PDF via File > Export > Create PDF/XPS Document.
<SlidesAICTA2 />
Read Related – How to Add a GIF in PowerPoint
Saving and Exporting for Print
Once you’ve finished designing your poster in PowerPoint, save it as a PDF. This ensures your poster is print-ready, preserving your formatting and design exactly as you created it.
For Windows and Mac OS:
- Go to ‘File’, then ‘Export’ (Windows) or ‘Save As’ (Mac OS).
- Choose ‘Create PDF/XPS Document’ (Windows) or select PDF as the file format (Mac OS).
- On Mac OS, set the print quality to ‘High’.
For Web:
- Select ‘File’ > ‘Download as’, or ‘Save as’.
- Choose ‘Download as PDF’.

💡 PDFs are widely compatible with printing devices and maintain your poster’s formatting, layout, and design better than other file formats.
Also Read – How to Save a PowerPoint Slides as an Imaget
Key Tips for Creating Poster Content
Creating an effective poster isn’t just about good design; your content needs to be clear, concise, and well-organised to make an impact. Here are some essential tips to help your poster stand out and communicate your message effectively:
- Keep your title short and engaging: Use a strong, attention-grabbing headline that reflects your topic.
- Use bullet points instead of long paragraphs: This makes the content easier to scan and digest at a glance.
- Choose a clear structure: Organise your content in a logical flow, introduction, main points, and conclusion.
- Highlight key data or stats: Use visuals like charts or icons to emphasise important facts and figures.
- Be mindful of white space: Avoid overcrowding your poster. Leave enough breathing room between elements to enhance readability.
- Stick to 2–3 font styles: Consistency in typography maintains a clean and professional look.
- Use high-resolution images: Blurry visuals can distract from your message, so always use good-quality graphics.
<SlidesAICTA3 />
Poster Design Tips
🎨 Poster sizes
Common poster sizes include 24×36 and 56×36. To check your poster size, go to the ‘Design’ tab > ‘Slide size’ > ‘Custom slide size.’


If you’re converting from paper sizes (in inches), these are the dimensions to use:
- A0 (33.1 x 46.8 in)
- A1 (23.4 x 33.1 in)
- A2 (16.5 x 23.4 in)
- A3 (11.7 x 16.5 in)
- A4 (8.3 x 11.7 in)
💡 Always design your file at full size (100%)!
🎨 Image Resolution
The quality of images is crucial, especially when it comes to printing versus displaying on the web. Print materials generally require higher resolution graphics to ensure clarity and sharpness on paper.
- For printing: Aim for a minimum of 150 dpi (dots per inch). For best quality, 300 dpi is ideal.
- For web use: 72 or 96 ppi (pixels per inch) is sufficient. Lower resolutions result in smaller file sizes, which are quicker to load online.

💡 Remember, an image’s resolution refers to its level of detail. Higher resolution means more dots or pixels per inch, leading to clearer and more detailed images.
🎨 Colors and Backgrounds
- Using colors in your poster? Choose and stick to 2 or 3 complementary colors for best visual impact.
- Ensure there’s good contrast between your text, images, and background. This contrast is key to making your content easy to read.
- For backgrounds, whether you choose solid colors, gradients, or images, aim for subtlety. Often, a light-toned background color works well, but sometimes a background isn’t necessary to convey your message.

💡 Printing tip: Colors can look different when printed compared to on-screen. For printing, the CMYK color mode is recommended. Check with your printing service for any specific requirements or adjustments needed.
🎨 Fonts, Text, and Titles
- Organize your content using a separate text box for each paragraph or section.
- For the body text, choose legible fonts, especially if your poster is text-heavy. PennState recommends these easy-to-read fonts:
- Sans-serif fonts: Verdana, Lucida Sans/Lucida Grande, Tahoma, Andika
- Serif fonts: Georgia, Palatino/Palatino Linotype, Book Antiqua
- When selecting font sizes, consider your poster’s size and viewing distance. If unsure, start with these font sizes and adjust accordingly:
- Title: 72 to 85pt for visibility
- Sub-headings: 36 to 40pt for emphasis
- Body text: 24pt or larger for readability
- Captions: 18pt to be legible
💡 To maintain a cohesive poster design, limit yourself to two font types.
For example, use a serif font for your title to draw attention and a sans-serif font for body text for easy reading. Mixing too many fonts can overwhelm and distract your audience.
<SlidesAICTA1 />
Summary
Creating a poster in PowerPoint is a simple yet powerful way to communicate your message visually. Whether you’re using built-in templates or designing from scratch, PowerPoint gives you all the tools to create a clean, professional, and engaging poster. With the right layout, content, and design touches, your poster can leave a lasting impression on your audience.
Frequently Asked Questions About Making a Poster in PowerPoint
Does this tutorial work for other versions of PowerPoint?
Yes, you can follow the same steps for the Windows, Mac OS, or the web (online) version of PowerPoint.
What’s the maximum poster size in PowerPoint?
The maximum slide size in PowerPoint is 56” x 56” (142.24cm x 142.24cm). If you need a larger poster size, consider using dedicated design software like Adobe InDesign, Illustrator, Photoshop, or Affinity Publisher.
Can I design the poster using another presentation software and convert it to .ppt?
Yes, you can use similar software like Google Slides and convert your files.
What file format should I use to share my poster?
Use PDF format for sharing and printing. It ensures your design remains intact across different devices and printers.
Related Posts
-

Creating clear and visually engaging presentations is an important part of getting your message across…
-

{ “@context”: “https://schema.org/”, “@type”: “BreadcrumbList”, “itemListElement”: [{ “@type”: “ListItem”, “position”: 1, “name”: “Home”, “item”: “https://www.slidesai.io/”…
-

Adding creative design elements to your slideshow presentations can make them more visually appealing. Curved…
-

{ “@context”: “https://schema.org/”, “@type”: “BreadcrumbList”, “itemListElement”: [{ “@type”: “ListItem”, “position”: 1, “name”: “Home”, “item”: “https://www.slidesai.io/”…
-

Picture this: You’ve poured your heart and soul into creating a presentation for your final…