If you want to change the design of multiple slides at once, you can edit the Master Slide in Google Slides. The Master Slide, accessed through the theme editor, lets you manage recurring design elements such as fonts, colors, backgrounds, and other theme elements without editing every slide individually.
Why Use the Master Slide?
Using the master slides feature in Google Slides is handy because it lets you adjust the overall look of your presentation in one place, rather than making the same changes on each individual slide. This is especially useful if you have a lot of slides to work with.
For example, if you want all your titles to be in a certain font or color, or if you want to place a logo on every slide, you only need to set it up once on the master slide, and it will automatically appear on all your slides.
The master slide also keeps your presentation visually organized. It helps everything look professional, without extra effort on each slide. Plus, if you need to make changes later on, you can just edit the master slide, and it will instantly update the entire presentation, saving you time and hassle.
You can also start with professionally designed Google Slides templates instead of editing layouts manually.
How to Edit Master Slide in Google Slides?
Looking to edit your slides like a pro? Here’s how to do it with Master Slides:
Step 1: Open Your Presentation: Start by opening the Google Slides presentation you want to edit.
Step 2: Navigate to the Master Slide View:
- Click on View in the top menu.
- Select Theme Builder from the dropdown menu.
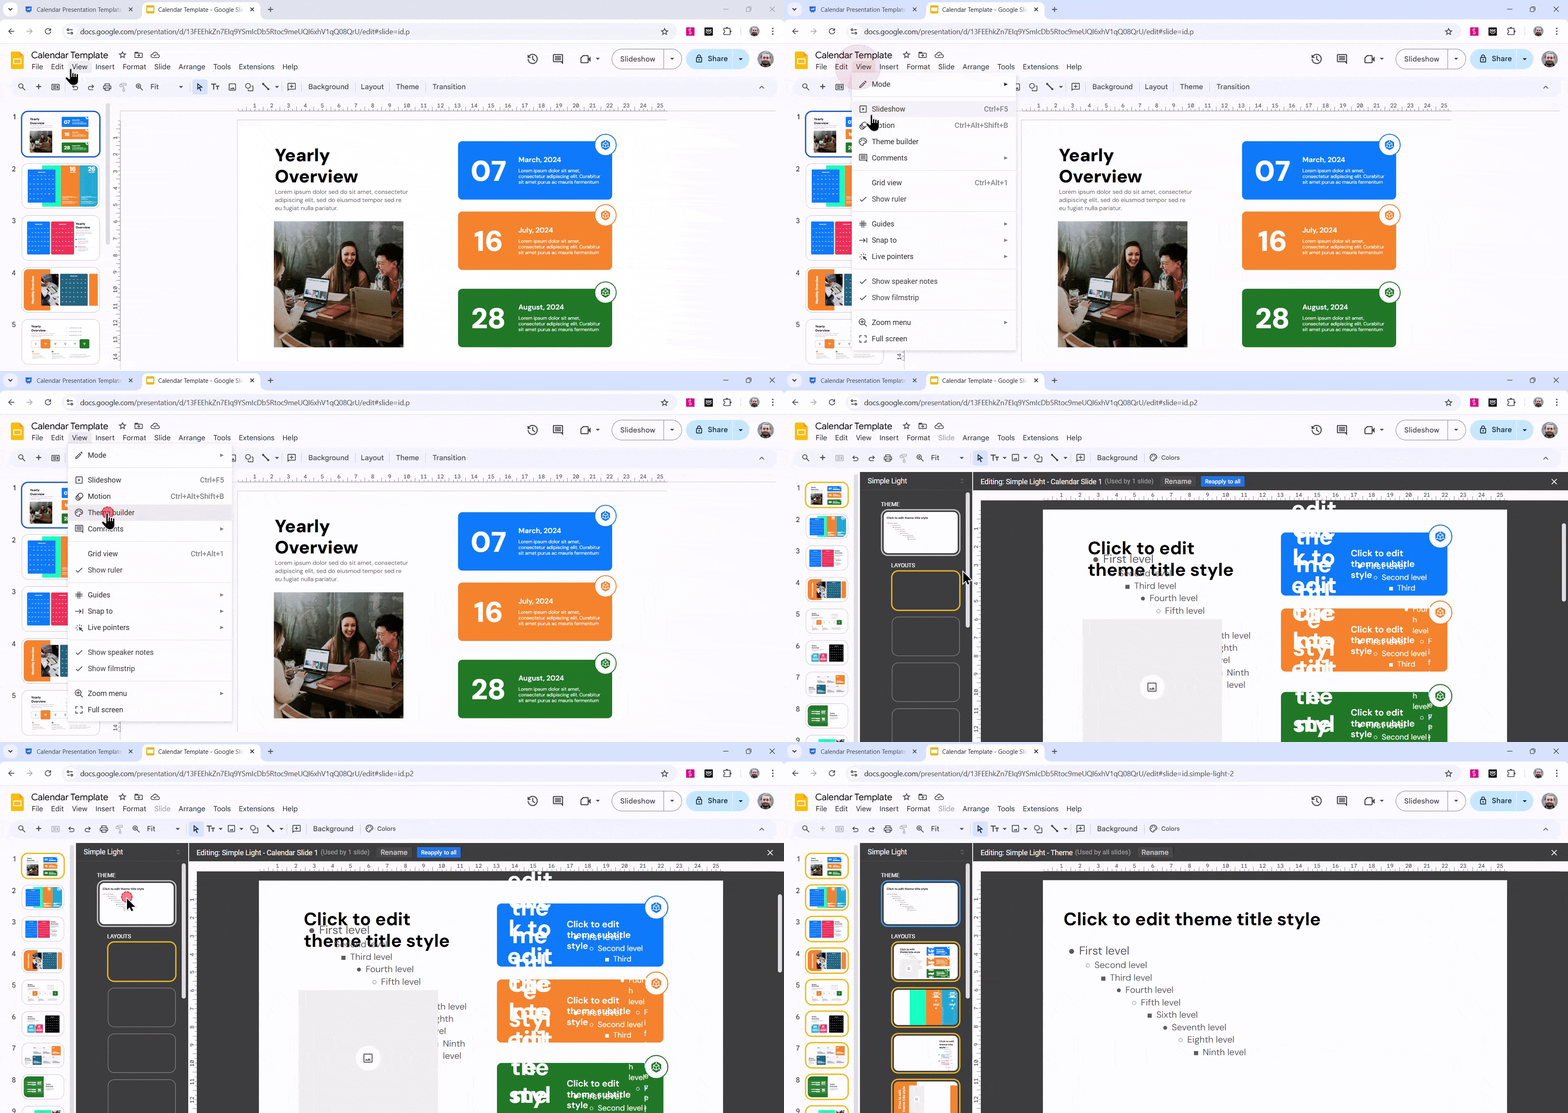
Step 3: Select the Master Slide: You’ll see a variety of slides, including the Master Slide. It’s usually the first one, often labeled “Master.”
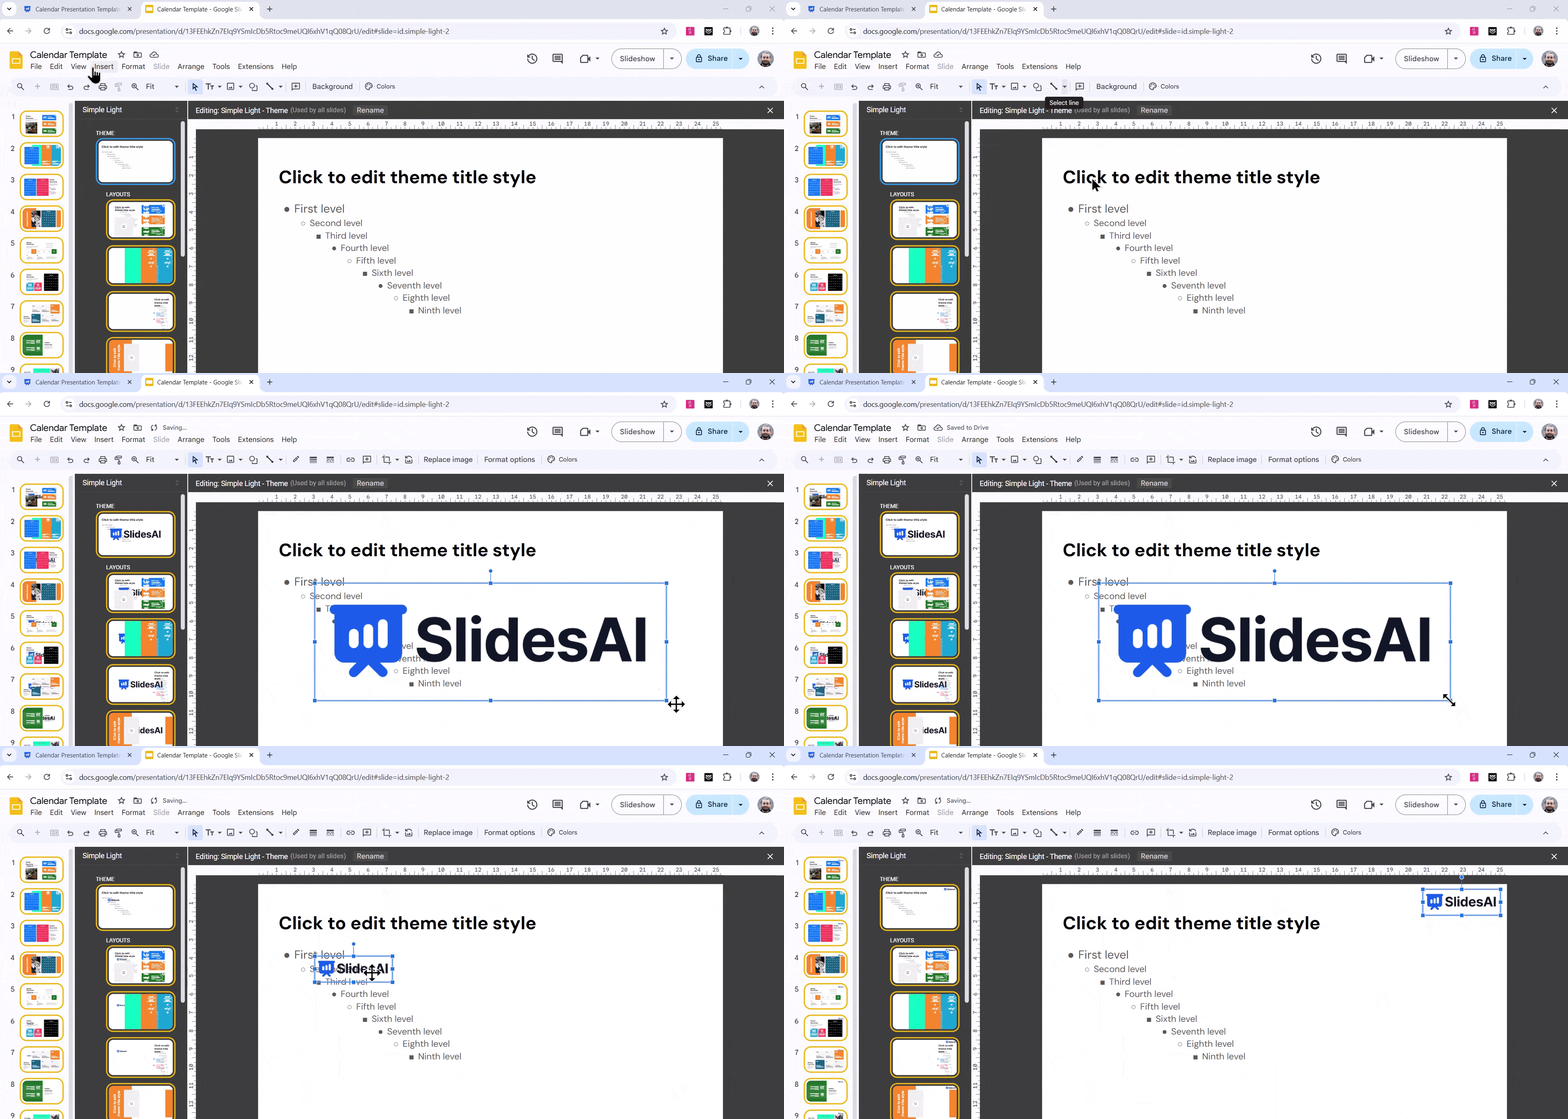
Step 4: Make Your Edits: Now, you can make changes to the Master Slide:
- Add or Remove Elements: You can add text boxes, images, shapes, or other elements.
- Modify Existing Elements: Change the font, color, size, or position of text, images, or other elements.
- Adjust Slide Layout: Change the layout, background color, or theme of the slide.
Step 5: Close Master View: Once you’ve finished editing, click on Close Master in the top right corner of the screen.
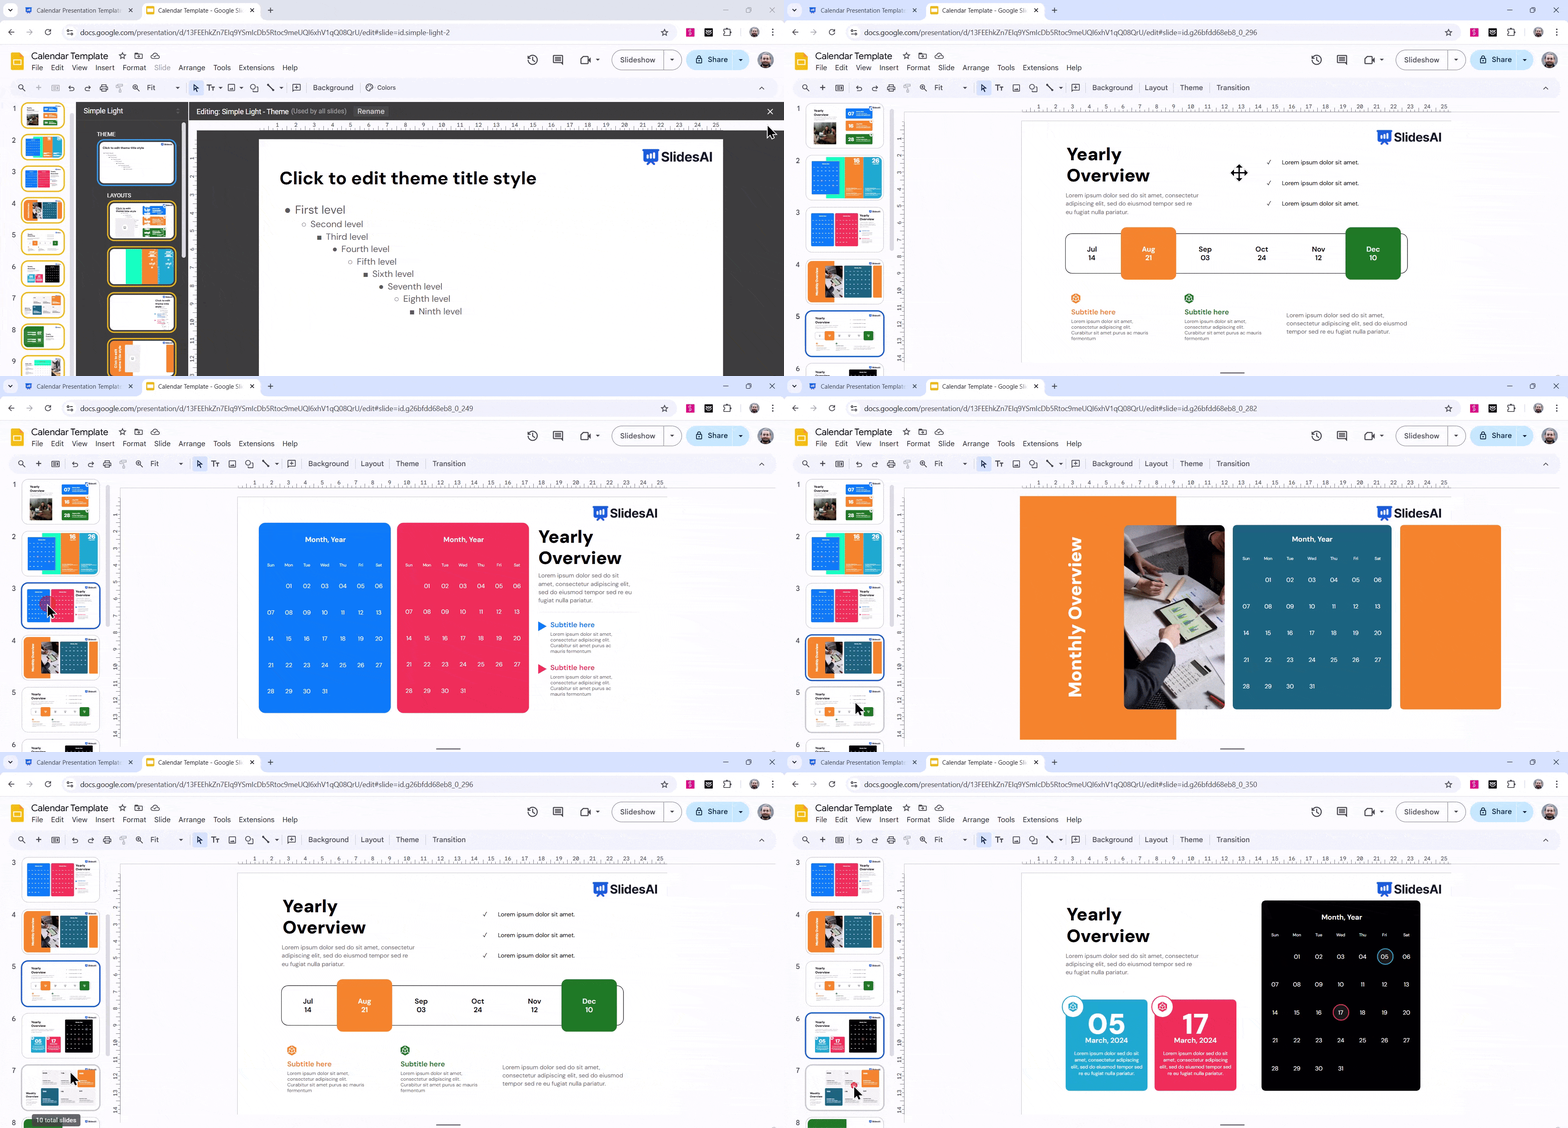
Remember: Any changes you make to the Master Slide will be reflected in all the slides in your presentation. So, be mindful of the modifications you make.
<SlidesAICTA3 />
Closing Thoughts
Editing the master slide in Google Slides is a simple way to keep your presentation looking consistent and save time. By making changes to the master slide, you can quickly update your entire presentation. It’s a handy tool that makes organizing your slides easier, especially for larger projects.
Want to skip manual theme editing? Use an AI Presentation Maker to generate beautifully designed presentations in minutes.
Frequently Asked Questions Related to Editing Master Slide in Google Slides
How do I layer images in a collage on Google Slides?
To layer images, just right-click on an image and choose “Order.” From there, you can select options like “Send to Back” or “Bring to Front” to change the order of the images in your collage.
Can I add text to my Google Slides collage?
Yep, you can add text by using the Text box tool. Just click on “Insert,” then “Text box,” type your text, and place it where you want on the slide.
Is it possible to add borders or effects to images in my collage?
Absolutely! To add a border, click on the image, then use the “Border weight” tool to choose how thick you want the border. You can also change the border color using the “Border color” tool.
Can I share my Google Slides collage with others?
Yes, you can. Just click the “Share” button at the top-right of Google Slides, and you can either send a link or invite people by email to view or edit your slide.
Related Posts
-

Working with multiple slides at once in Google Slides can save you a lot of…
-

Adding slide numbers to your presentation is a neat way to keep everything organized. When…
-

{ “@context”: “https://schema.org”, “@type”: “FAQPage”, “mainEntity”: [ { “@type”: “Question”, “name”: “Can I hide slides…
-

{ “@context”: “https://schema.org”, “@type”: “FAQPage”, “mainEntity”: [{ “@type”: “Question”, “name”: “Why should I time my…
-

Creating a great presentation is not just about adding content; it’s also about maintaining a…