
To add a border in Google Slides: Insert > Shape > Rectangle → draw it across the full slide → set Fill color to Transparent → choose a Border color and Border weight from the toolbar → right-click → Order → Send to Back. For all slides at once, use Slide > Edit Master instead.
This guide covers 5 methods to add a border in Google Slides:
- Add a border to a single slide (rectangle shape method)
- Add a border to all slides at once (Slide Master method)
- Add a border to an image in Google Slides
- Add a border to a text box or shape
- Use a ready-made border template with SlidesAI
All methods work directly inside Google Slides — no add-ons, no design skills, no third-party tools required.
Why Add a Border in Google Slides?
Google Slides doesn’t include a built-in ‘slide border’ button — but that doesn’t mean you can’t create one. A well-placed border does more visual work than it might seem:
Defines structure. A border draws a clear boundary around your slide content, making each frame easier to scan at a glance — especially useful in dense, data-heavy decks.
Reinforces branding. Matching your border color to your brand palette ties every slide together without elaborate design work.
Directs attention. Borders placed around images, text boxes, and shapes naturally pull audience focus to what matters most.
Adds personality. A decorative or themed border gives a presentation a distinctive look without requiring deep design skills.
Borders can be as minimal as a single thin line or as bold as a thick colored frame, and they apply to the full slide, individual images, or any element you choose.
How To Add a Border in Google Slides?
Method 1: Adding a border in a single slide
Here’s how to add a custom border to your slides:

Step – 1. Pick your Slide: Open your presentation and select the slide where you want the border.
Step – 2. Insert a Shape: Go to the top menu and click “Insert” > “Shape.”
Step – 3. Choose and Draw the Border: Select a shape (rectangles are common for borders) and drag it around the edges of the slide to create your desired border size.
Step – 4. Style Your Border (optional):
-
- Adjust the thickness using the “Border weight” option in the format menu.
-
- Change the border style (solid, dotted, etc.) from the “Border dash” option.
Step – 5. Set the Border Color: Click on the border to select it, then choose a color from the “Fill color” option in the format menu.
Step – 6. Send Border to Back (optional): If your content is hidden behind the border, right-click it, hover over “Order,” and choose “Send to back” to ensure your slide content remains visible.
Method 2: Adding a border in all slides
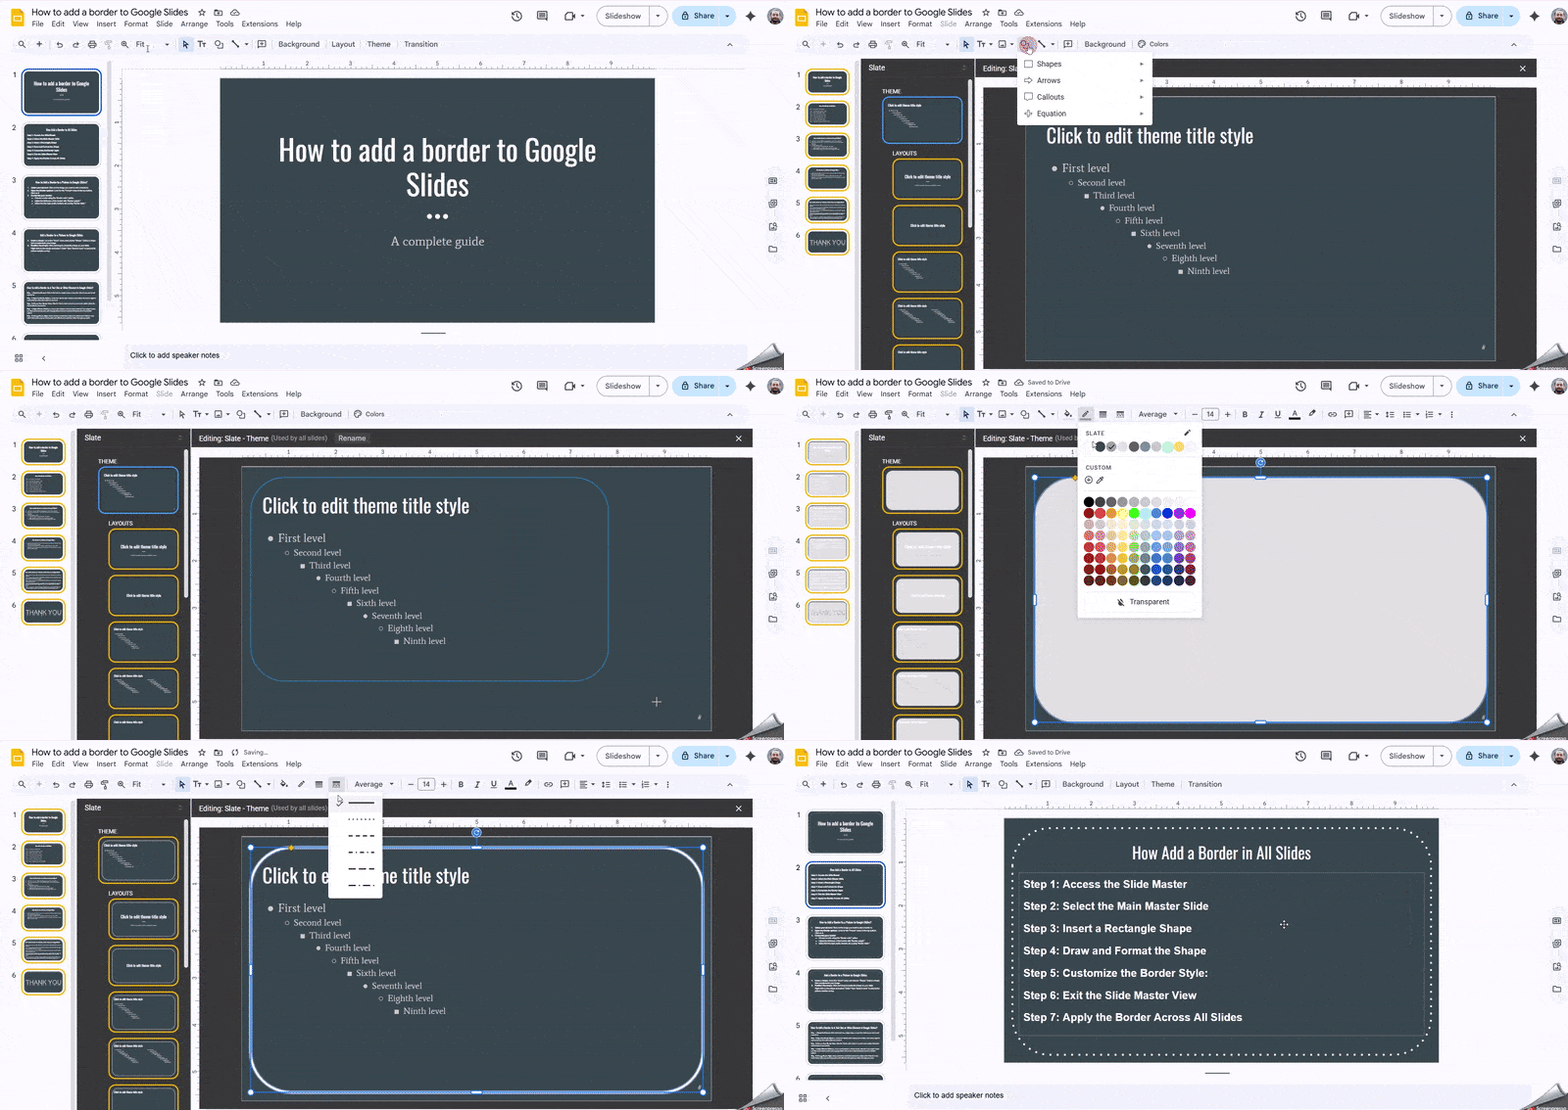
Adding a border to every slide in Google Slides helps create a polished, cohesive look for your presentation. Follow the steps below to quickly add a uniform border using the Slide Master.
Step 1: Access the Slide Master: Open the Slide Master by navigating to Slide > Edit Master.
Step 2: Select the Main Master Slide: In the left-hand panel, select the topmost master slide so the border is applied to all slide layouts.
Step 3: Insert a Rectangle Shape: Go to Insert > Shape and choose a rectangle.
Step 4: Draw and Format the Shape: Draw the rectangle so it covers the entire master slide. Open the Fill color menu and set the fill to transparent.
Step 5: Customize the Border Style: Adjust the Border color, Border weight, and Border dash settings to match your preferred style.
Step 6: Exit the Slide Master View: Once you’re done, exit the Master view by clicking anywhere outside the slide area or selecting the X in the top-right corner.
Step 7: Apply the Border Across All Slides: Return to your presentation. Your newly created border will now appear on every slide.
How to Add a Border to a Picture in Google Slides?
Here’s how to add a border to your pictures in Google Slides:
Using the Built-in Border Tool:
-
- Select your picture: Click on the image you want to add a border to.
-
- Open the Border options: Look for the “Format” menu in the top toolbar. Click on it.
-
- Customize your border:
-
- Choose a color using the “Border color” option.
-
- Adjust the thickness of the border with “Border weight.”
-
- Select the line style (solid, dashed, etc.) using “Border dash.”

Add a Border to a Picture in Google Slides (Optional):
-
- Insert a shape: Go to the “Insert” menu and choose “Shape.” Select a shape that complements your image.
-
- Position the shape: Click and drag to create the shape on your slide. Right-click on the shape and select “Order” then “Send to back” to ensure the picture remains on top.
-
- Style the shape: Click on “Format” in the top menu to edit the color, line style, and other effects of your chosen shape.

Removing a Border:
-
- Access the Border options: Click on the image and then the “Format” menu.
-
- Make it transparent: Choose “Border color” and select “Transparent” from the options.
Related Read – How to Add a Border Design in PowerPoint + Free Templates
How To Add a Border to A Text Box or Other Element in Google Slides?

Step – 1. Select the Element: Click on the text box, image, shape, or any other element you want to add a border to.
Step – 2. Open the Border Options: Locate the “Border color” button on the toolbar. This button might be represented by a line with a color box next to it.
Step – 3. Choose Your Border Color: Click the “Border color” button to reveal a color palette. Select the desired color for your border.
Step – 4. Adjust Border Thickness: If you want a thicker or thinner border, click the “Line weight” button (usually represented by a line with varying widths). Choose the desired thickness from the available options.
Step – 5. Change Border Style: Want a dashed or dotted line instead of a solid border? Click the “Line dash” button (often represented by a line with different dash patterns). Select the style you prefer.
Create professional Google Slides presentations in minutes with our AI Google Slides Creator, then customize them with borders, colors, and other design elements.
How To Add a Border in Google Slides Using SlidesAI?

Step 1: Open SlidesAI > Templates
Step 2: Select the Border Presentation Template and download it for Google Slides.
Step 3: A template preview will open. On the top right corner click on “Use template” Button
Step 4: The template will open in Google Slides. You can choose any of your choice. Customize the slides as per your requirements.
How to Remove a Border in Google Slides
To remove a border in Google Slides, select the border element, then set its color to transparent or delete it entirely.
To remove a border from a shape or slide frame:
- Click the border (rectangle shape) to select it.
- In the toolbar, click Border color.
- Select Transparent. The border will disappear while the shape remains (allowing easy re-styling later).
- Alternatively, press Delete or Backspace to remove the shape entirely.
To remove a border from an image or text box:
- Select the image or text box.
- Click Format in the top menu.
- Under Border color, select Transparent.
If you added borders through the Slide Master and want to remove them globally, go to Slide > Edit Master, select and delete the border shape from the master slide, then close the master view.
Border Design Tips for Google Slides
A border is only as good as its implementation. Here are five quick rules for borders that look intentional rather than accidental:
- Match border color to your brand palette. Using a random color creates visual noise. Pick one of the existing accent colors from your theme.
- Keep border weight proportional to slide size. For standard 16:9 slides, a border weight of 4–8 pt looks clean. Go thinner for minimal designs, thicker for bold or poster-style slides.
- Use transparent fill — always. When adding a border with a rectangle shape, always set the fill to transparent. A filled rectangle will block your slide content.
- Send the border shape to back. Right-click the border rectangle → Order → Send to Back. This ensures your text, images, and other elements remain visible on top.
- Use the Slide Master for consistency. If you want the same border on every slide, adding it in the Slide Master view (Slide > Edit Master) is far faster than duplicating it manually.
Closing Thoughts
Borders are a powerful tool to add visual interest and polish to your Google Slides presentations. With a few easy steps, you can create stylish borders that frame your entire slide deck or highlight specific elements. Borders help guide your audience’s focus and give your slides a professional touch. Don’t be afraid to experiment with different colors and thicknesses to find the perfect look that complements your content and message.
Borders are just one way to elevate your slide design. You can also try using visual aids like a timeline, venn diagram, or even a calendar to improve audience understanding.
<SlidesAICTAGoogleSlides />
Frequently Asked Questions
Why use borders in Google Slides?
Borders can:
-
- Highlight important content by drawing attention to specific areas of your slide.
-
- Create a professional look and add polish to your presentation.
-
- Enhance visual appeal by adding visual interest and separating elements.
Can I add borders to different things?
Yes! You can add borders to various elements in your presentation, including:
-
- Text boxes
-
- Images
-
- Shapes
-
- Other objects
This lets you customize the look of specific elements to fit your design.
How can I customize borders?
You have full control over the appearance of your borders. You can change:
-
- Color: Match your presentation’s theme or choose a color that stands out.
-
- Thickness: Make borders subtle or bold depending on your needs.
-
- Style: Choose from solid lines, dotted lines, or other styles.
Can I edit or remove borders after adding them?
Absolutely! Google Slides allows you to easily modify or remove borders. Simply select the object and access the “Borders and lines” settings. There, you can make changes or remove the border completely.
Do borders affect file size?
No, adding borders won’t significantly increase your presentation’s file size. They are considered a minor design element and have minimal impact on file size.
Can I use borders on mobile devices?
Yes! You can add and customize borders to elements in Google Slides using both iOS and Android devices. This ensures a consistent design experience regardless of the platform you’re using.
Can you add a border to all slides in Google Slides at once?
Yes. Use the Slide Master to apply a border to every slide simultaneously. Go to Slide > Edit Master, select the main master slide at the top of the left panel, insert a rectangle shape that covers the full slide, set its fill to transparent, and style the border as desired. When you close the master view, the border appears on all slides. Any change to the master border updates all slides instantly.
How do I change the border thickness in Google Slides?
Select the border element (the rectangle shape or image), then click the Border weight button in the toolbar — it looks like a horizontal line with varying widths. Choose a thickness from the dropdown. Common choices are 2 pt for subtle borders, 4–6 pt for standard frames, and 8 pt or higher for bold, decorative styles. You can also type a custom value directly into the Border weight field.
Related Posts
-

Do you sometimes see a faint logo or text appearing in the background of an…
-

Speaker notes in Google Slides can be a valuable tool for improving your presentations. They provide a way to add…
-

Adding slide numbers to your presentation is a neat way to keep everything organized. When…
-

Learn about Google Slides animations in this easy tutorial. Step-by-step guide to animating text and…
-

Learn how to add transitions to Google Slides to make your presentation more dynamic. Also…