Adding background music to your PowerPoint presentation can make it stand out and grab attention. PowerPoint gives you the option to add music by inserting any WAV or MP3 file into your slides. If you’re using a Mac, you can even pull music directly from iTunes.
Another option is to use music from video-sharing sites like YouTube. This guide will walk you through four different ways to add audio to your PowerPoint slides. Let’s dive in and get started.
Methods to Add Music to a PowerPoint Presentation
If you’re looking to enhance your PowerPoint presentation with some music, there are several simple ways to do so. Here, we’ll explore different methods to add music to your slides and make your presentation more engaging.
Method 1: Inserting Pre-recorded Audio from your PC

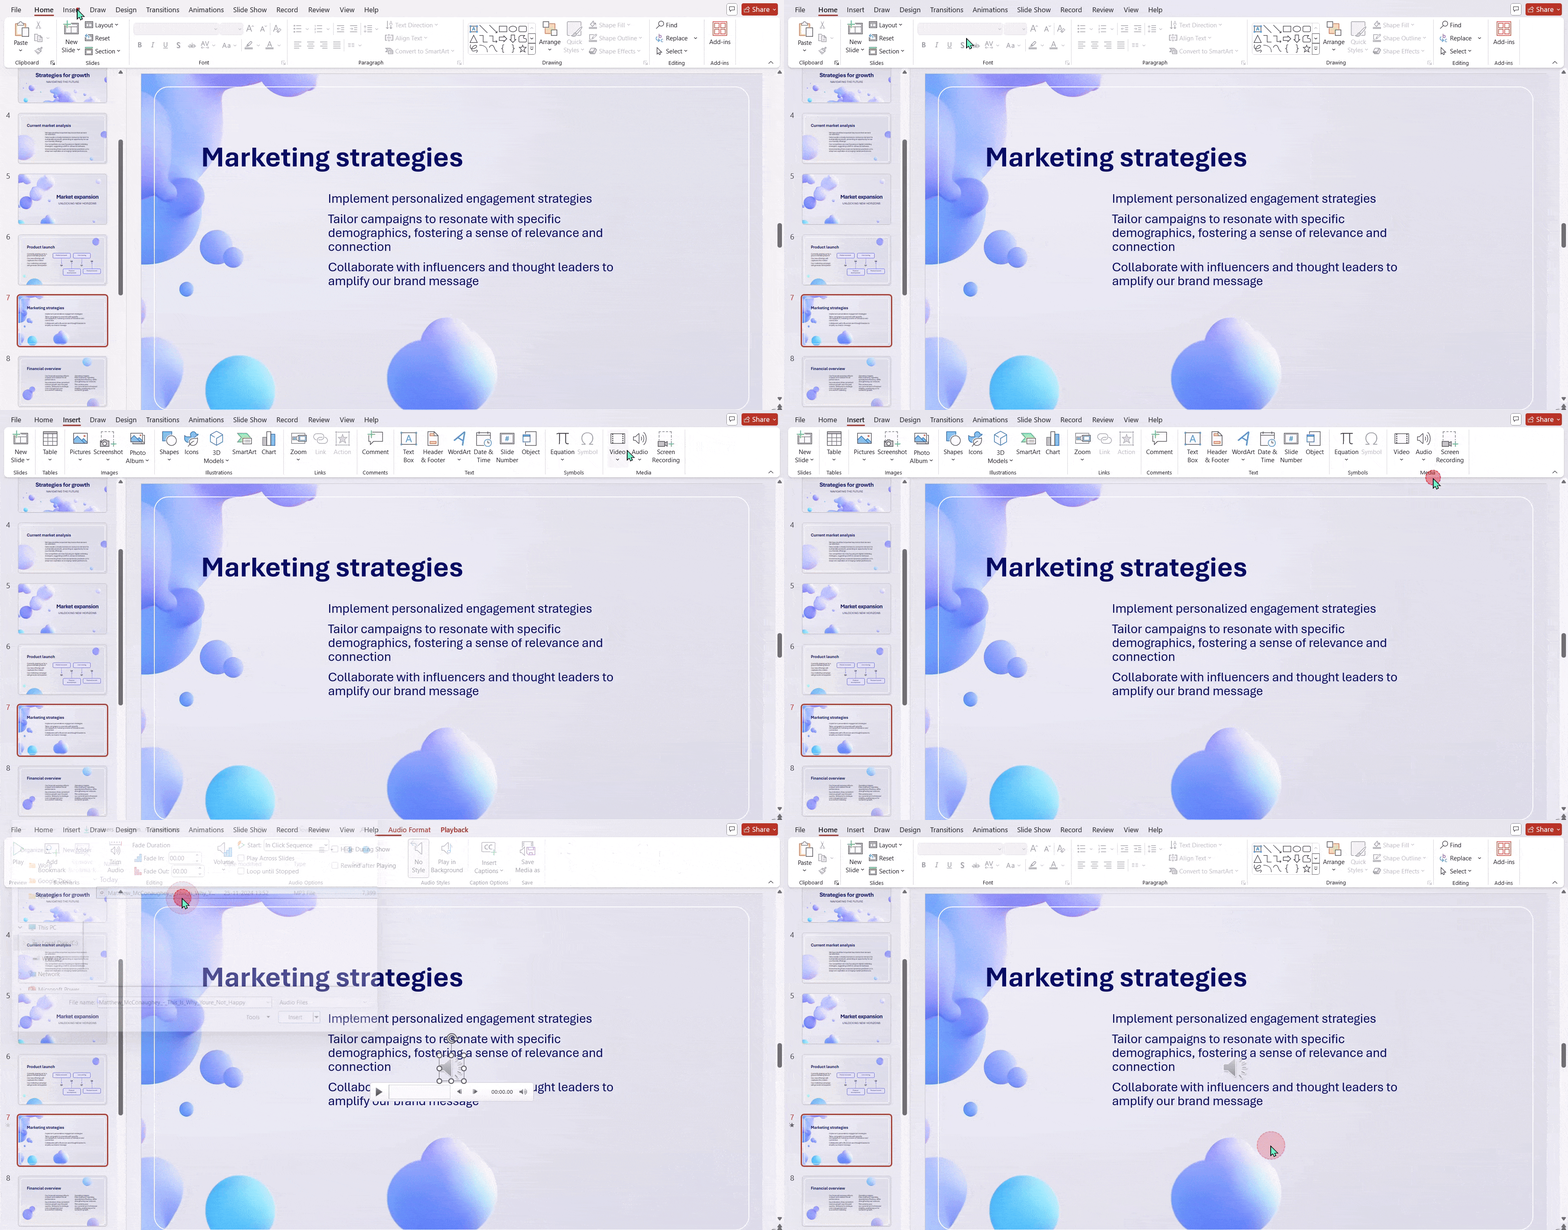
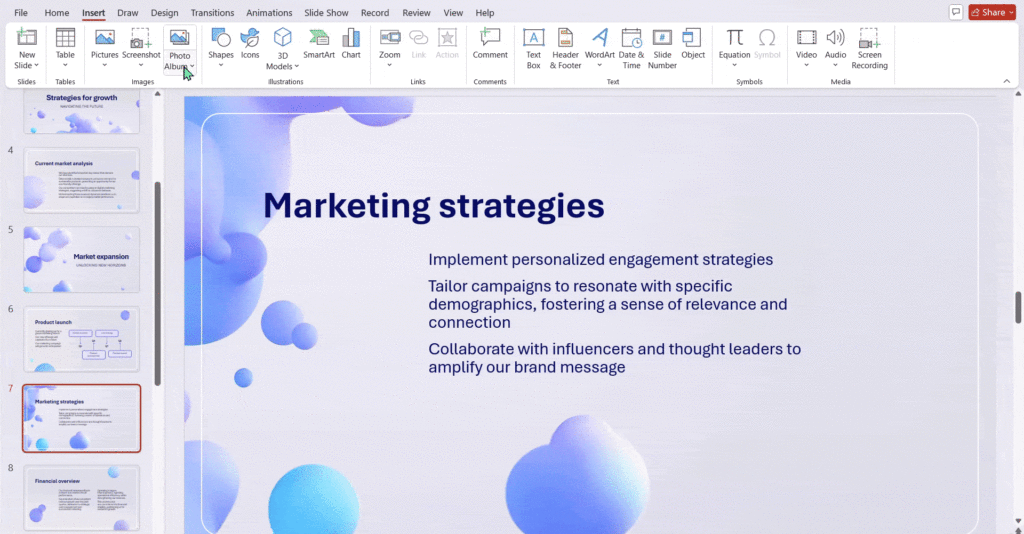
- Locate the Insert Tab: Look for the “Insert” tab at the top of your PowerPoint window.
- Select Audio: Click on the “Audio” icon.
- Choose Your Audio File: A dialog box will appear. Navigate to the location of your desired audio file on your computer.
- Insert the Audio: Select the audio file and click “Insert.”
<SlidesAICTA4 />
Method 2: Recording Audio Directly in PowerPoint

- Access the Recording Tool: Again, go to the “Insert” tab and click the “Audio” icon.
- Start Recording: Choose the “Record Audio” option.
- Name Your Recording: Give your audio recording a name.
- Begin Recording: Click the “Record” button and start speaking.
- Review and Edit: Once you’re done, click “Stop.” To listen to your recording, click “Play.” If you’re not satisfied, click “Record” to re-record. If you’re happy with the recording, click “OK.”
- Place Your Audio: Drag and drop the audio icon to the desired location on your slide.
- Tip for Multiple Audio Files: To keep your slides organized, try placing the audio icon in the same spot on each slide.
- Play Your Audio: Click the audio icon to play the sound.
Read Related – How do You Apply Transistion in PowerPoint
Method 3: YouTube Music to PowerPoint
There are two main approaches to incorporating music from YouTube into your PowerPoint presentation. You can either download the audio track and add it as a standalone file or directly embed the YouTube video itself. Let’s explore both methods:
1. Adding Downloaded Audio:
This approach gives you more control over the music and avoids potential copyright issues with embedded videos.

- Find the Music: Head over to YouTube and search for the music you want to use.
- Download the Audio File: Various online converters allow you to extract the audio from YouTube videos. However, be cautious and choose a trusted website. Popular options include ytmp3, y2mate, or savefrom.net.
- Copy and Convert: Once you’ve chosen your converter, locate the desired YouTube video and right-click to copy the video URL. Paste this link into the converter’s search bar. Most converters offer various output formats; choose MP3 for a widely compatible audio format. Initiate the conversion process and download the resulting audio file to your device.
- Adding Audio to PowerPoint: Now that you have the downloaded audio, it’s time to incorporate it into your presentation. In PowerPoint, navigate to the slide where you want the music to play. Open the “Insert” tab on the ribbon and then select “Audio” followed by “Audio on My PC.” Browse your computer’s files and locate the downloaded music file. Select the file and click “Open” to add it to your slide.
2. Embedding a YouTube Video:
This method allows you to directly integrate the music video with its visuals, but keep in mind that playback might be dependent on an internet connection and potential copyright restrictions apply.

- Locate the Video: Open YouTube and find the specific music video you want to add to your presentation.
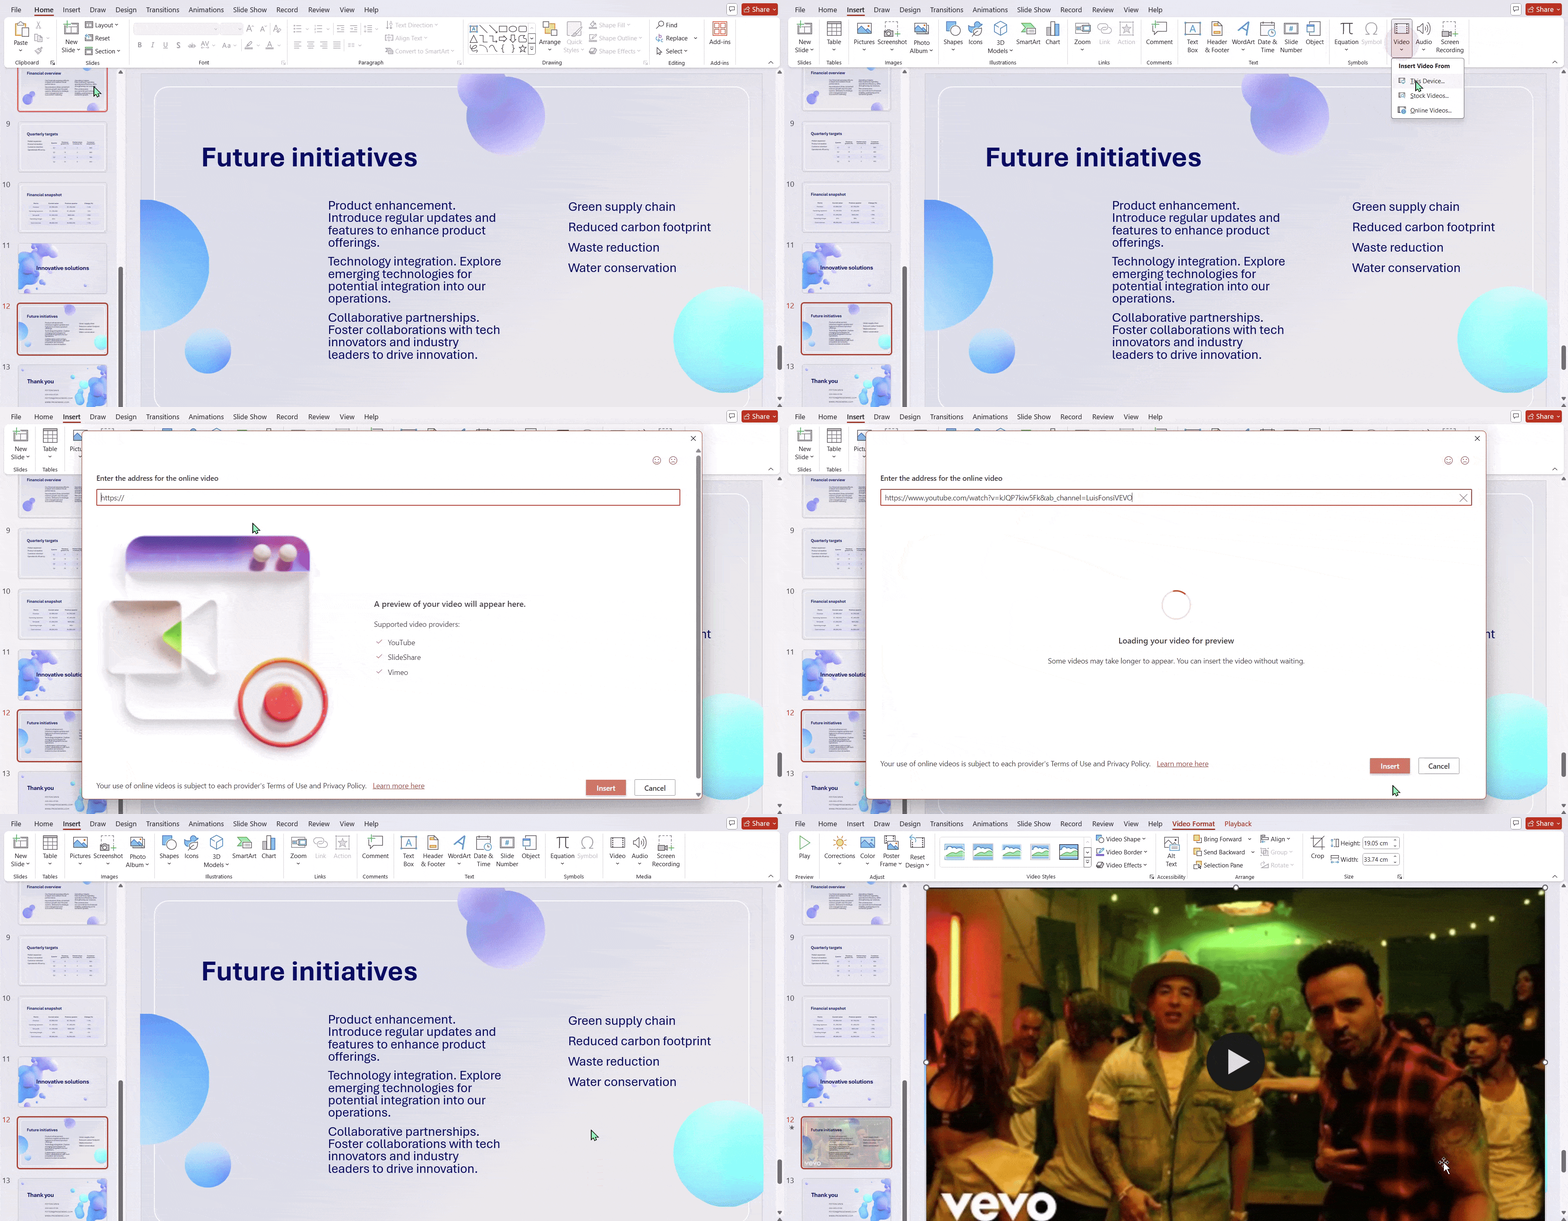
- Copy the Video URL: Right-click on the video and select “Copy video URL.”
- Embed the Video in PowerPoint: Open your PowerPoint presentation and navigate to the slide where you want to insert the video. Go to the “Insert” tab, then click “Video” followed by “Online Video.” Paste the copied YouTube video URL into the designated box and click “Insert.”
- Adjusting the Video: The video will appear on your slide. You can resize and reposition it according to your preference. To control playback, click on the video and switch to the “Playback” tab. Here, you can choose whether the video starts automatically during the presentation or plays when clicked.
<SlidesAICTA5 />
Method 4: Add Music from iTunes on the Mac
- Select the Slide: Begin by choosing the slide where you’d like to insert the music.
- Access the Insert Menu: Click on the Insert tab in the PowerPoint ribbon.
- Choose Audio Option: Look for the Audio button within the Insert tab. A dropdown menu will appear.
- Select Audio Source: You’ll have two options:
- Audio from File: This allows you to insert a local audio file from your computer.
- Audio Browser: This option lets you select music directly from your iTunes library.
- Insert the Audio: Choose the desired audio source and select the specific audio clip you want to add to your slide.
- Customize Audio Settings (Optional):
- Click on the Audio Format tab.
- Here, you can adjust various audio settings like playback options, volume, and fade effects.
- Modify Audio Icon Appearance (Optional):
- To change the default audio icon, use the formatting options available on the Audio Format tab.
- You can add a frame, border, or other visual effects to the icon to personalize its look.
Read Related – How Add Animation in PowerPoint
Steps for Customizing Music Playback

1. Add Bookmarks
You can add bookmarks to mark specific points in the audio for quick access. This helps you easily jump to the parts you need.
Steps: Insert audio → Go to the Playback tab → Click on Add Bookmark → Place markers at the desired times.
2. Trim Audio
If you want to play only a specific section of the audio, you can trim it by setting the start and end points.
Steps: Insert audio → Go to the Playback tab → Select Trim Audio → Adjust the start and end times.
3. Fade In and Fade Out
To make the audio start or end smoothly, you can use fade-in and fade-out effects.
Steps: Insert audio → Go to the Playback tab → Set the times for Fade In and Fade Out.
4. Control Volume
You can adjust the audio’s volume to suit your needs. Options include Low, Medium, High, or Mute.
Steps: Insert audio → Go to the Playback tab → Select Volume → Choose your preferred level.
5. Play On Click
Make the audio start playing when you click on it during the presentation.
Steps: Insert audio → Open the Animation Pane → Select the audio → Set it to start On Click.
6. Play Automatically
You can also have the audio begin as soon as the slide appears.
To do this: Insert audio → Go to the Playback tab → Use the Start dropdown menu → Choose Automatically.
7. Play When Clicked
If you prefer the audio to play only when you click the icon, this option allows for that.
Steps: Insert audio → Go to the Playback tab → Use the Start dropdown menu → Choose On Click.
8. Play Across Slides
You can keep the audio playing as you move through multiple slides.
Steps: Insert audio → Go to the Playback tab → Check the box for Play Across Slides.
9. Loop Until Stopped
Set the audio to play on a continuous loop until you manually stop it.
Steps: Insert audio → Go to the Playback tab → Check the box for Loop until Stopped.
10. Hide During Show
If you don’t want the audio icon to appear during your presentation, you can hide it.
Steps: Insert audio → Go to the Playback tab → Check the box for Hide During Show.
11. Rewind After Playing
You can set the audio to rewind automatically after it finishes playing.
Steps: Insert audio → Go to the Playback tab → Check the box for Rewind after Playing.
12. Play in the Background
To have the audio play across multiple slides, loop continuously, and hide the icon, use this option.
Steps: Insert audio → Go to the Playback tab → Select Play in Background.
13. Insert Captions
For accessibility, you can add captions to the audio. The captions must be in the WebVTT file format.
Steps: Insert audio → Go to the Playback tab → Select Insert Captions → Choose your caption file.
Each of these steps lets you customize the way audio plays during your presentations, helping you adjust it to match your requirements.
<SlidesAICTA4 />
Closing Thoughts
Adding music to your PowerPoint presentation can make it more engaging and leave a lasting impression on your audience. With several methods to choose from, you can tailor the audio to fit your presentation’s style and needs. By customizing playback settings, you have full control over how the music enhances your slides. Experiment with these options to find what works best for your project.
Read Related – How to Add a GIF in PowerPoint
Frequently Asked Questions About Adding Music in PowerPoint
1. How can I add music from Spotify to a PowerPoint presentation?
To add music from Spotify to your PowerPoint, follow these steps:
- Open Spotify and find the song you want to use.
- Right-click on the song, choose “Share,” and select “Copy Song Link.”
- Use a reliable Spotify-to-MP3 converter (like Spotifymate or Spotifydown).
- Paste the link into the converter’s search box, select MP3 as the format, and press Convert.
- Download the MP3 file to your computer.
- In PowerPoint, go to the Insert tab, choose Audio, and then select Audio on My PC to add the music file to your presentation.
2. How can I stop audio after a certain number of slides?
After adding music to your slides, follow these steps to stop the audio after a specific slide:
- Go to the slide where you added the audio.
- Click on the Animations tab in the ribbon.
- Open the Animation Pane from the toolbar.
- In the Animation Pane, double-click the audio file.
- In the dialog box that appears, go to the Effects tab. Under the Stop playing section, choose After and specify the number of slides you want the music to play.
- Click OK to save your changes.
3. How can I play multiple songs across slides in PowerPoint?
If your presentation lasts longer than a single song, you can add more tracks. For smoother transitions, you might consider using an audio editing tool like Audacity to combine the songs into one continuous file. This way, the music can play without interruptions throughout the slideshow.
4. What type of audio files can you use in PowerPoint?
PowerPoint supports several audio formats, including MP3, WAV, and WMA. Make sure the file you use is compatible with the version of PowerPoint you have installed.


